Friday, April 30, 2010

Moving Day

Packing up to change condos and meet my hubby. Thought I'd post a couple more pics of outdoor sculpture here in this beautiful city. There are many horse sculptures across this city. Some are elongated charactures of horses. This one caught my attention and funny bone.
And then I am always fascinated by big cats... this one out of solid granite.

Thursday, April 29, 2010

Sedona Arizona.. Among 10 most beautiful U.S. Cities

This town is absolutely beautiful.. every turn offers another postcard vista. This is a snap from this afternoon. Gorgeous mother nature!
Sedona has a population of 20,000 residents, all of which seem to either be artists, gallery owners or art lovers. Expressions of nature and art are inside and outside everywhere one looks. Outdoor sculpture is abundant.
Gone Fishing!:-)
Hubby Ray arrives tomorrow as I also move to a larger condo on the banks of Oak Creek.

Lots of leafy things

I said this will take a while and it is true. Such detailed quilting goes slow and strains the eyes and brain. I think I will need a day of mental rest and will be working today on info needed for my September -October Hawaii Quilting Cruise. (www.worldofquiltstravel.com)

Plenty of leafy extension remain to be quilted but it is progressing.

The different ink and thread values are creating some dimension.

A word on machines....My usual on the road sewing machine (a Juki TL98E) is acting up, so I'll move to my Bernina Artista next. This is exactly why I drive to retreat destinations whenever possible (I travel with 2 machines). I once at a retreat several hundred miles away had a computerized machine fail without a backup. Needless to say, with 3 days left at that retreat, I went to town and bought another machine. I have a healthy inventory of machines these days and don't wish to buy yet another, so I'm happy my Artista is here.
By the way... that computerized machine that failed??? It occurred in 2003 in a room with 20 plus quilters almost half of which also had personal ironing boards by their machine set up. The room was in a forest camp setting. Electrical wiring was old and probably inadequate for the number of people sewing. Here's what happened... After lunch, retreat campers all returned to their machines, turned machines AND their irons on at roughly the same time. There was such a draw on electrical power, that there was insufficent "juice" to power up computerized sewing machines. I immediatetly smelled burnt metal on my machine and turned it off quickly. Bottom line... a costly burnt circuit board. Non computerized machines without circuit boards were not affected, so HINT... thats a good traveling 'camp' type machine to carry with you. Now, whenever in a large shared environment setting, even if a newer facility I carry with me a UPS (uninterrupted power server). These are not expensive and worth every penny. They can be found in any electronics store and now in some sewing machine stores.

Wednesday, April 28, 2010

Leafy Dragon

My little head is spinning about what to do next.... There are many layers and elements in this piece. When it gets this crazy in the brain, just start dividing and conquering.... remembering at this stage to work near the central area of the quilt.

Moving on to beginning the leafy extensions off the main body. First, a darker leafy section further to the back.
Then to the front-most leafy extensions...
This will take some time as this guy is really leafy!!!!
In my travels mid-day today, I saw this unusual pieced PLAID star quilt draped across a wall outside the Cocopah shop in the heart of Sedona.
This is a very interesting plaid star block.

Tuesday, April 27, 2010

Flutterly spine

Every art quilt, even every element of an art quilt holds a challenge on how to quilt to best support the image and hold a viewers interest. We all give it our best shot at doing that. I saw a large challenge in how to quilt the fluttering spinal extensions coming off the top of my sea dragon's body. They wave in the water flow... but I couldn't clearly envision the water flow pattern I usually use in and around the extensions.
Thankfully artistic license allows us to do whatever seems to work best. So, to represent a transparent webbing that is part of this spinal extension, I decided to use smoke monofilament to complete a tiny overlapping circular pattern in and around the spinal extensions. Had I been at home with my thread stash, I would likely have used a clear Sulky sliver for this... but I think this will work alright and an occasional flicker of light off the monofilament will occur. This seems to be taking forever to complete partially because my machine is not enjoying this tiny motion using monofilament, BUT... I think it will be worth it.

The flowers here are exploding in beauty.
SPRING has definitely arrived in Sedona, Arizona.

Monday, April 26, 2010

Quilt Line Patterns are everywhere

The brand new carpet in my time share condo is a great example of art quilting inspiration found in both natural and man made designs. I see quilt line inspiration so often I should start a 12 step group. It has become an addiction.

Coral Spine

Sedona is both beautiful and hot so mid day is indoors for sure. I've finished the rest of the yellow dragon body and and beginning to accent spine-like areas on the body with coral ( though it photographed pink... sorry) accents.
I am not a golfer but 'am staying at a golf resort this week. Check out the beautiful greens.

Sunday, April 25, 2010

Ready - Set - Go!!!

Getting things ready to go is a bit like working a real job on a Friday before an anticipated weekend. I know what I have to do, it's not really fun, but it's worth it to get to the part I really look forward to... The quilting.
I work from the middle of the quilt outward in this quilt securing process using monofilament thread top and bottom. A few tips on monofilament:
Bobbin: wind the bobbin slowly... i.e. no peddle to the metal heavy foot. Doing so will stretch your monofilament and promote breakage during quilting.
Top thread.. lower the top tension to almost nothing. This thread seems even lighter than even 100 wt thread so little top thread tension is called for.
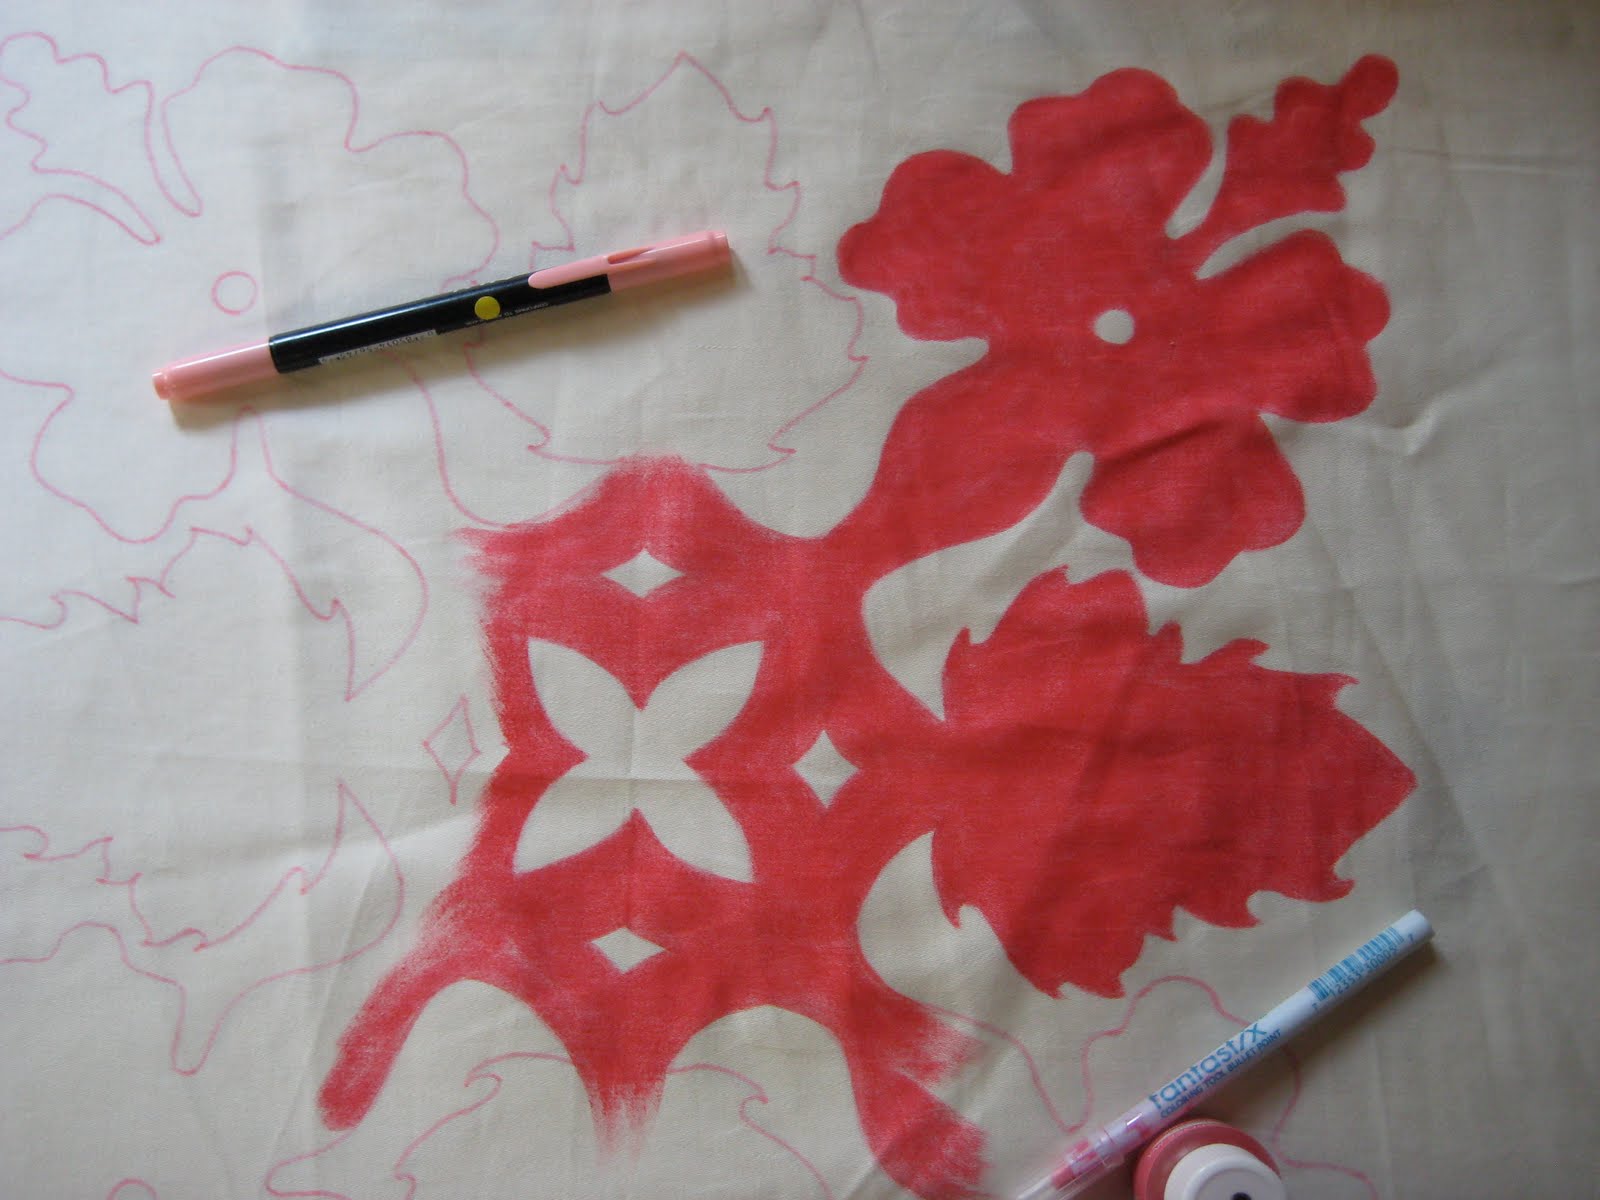
I do just enough stitching around painted elements to secure the front to back allowing me to remove some of the pins, later making quilting easier to take on.
Don't get too carried away by going around everything. It's just not necessary and frankly, you'll get bored and maybe even sloppy by doing it all.

NEXT UP... THE real FUN... QUILTING!
On a piece that will have significant amounts of quilting.. you'll likely get better results by working from the middle of the quilt outward in all directions. So.. I first want to begin in the middle of the Sea Dragons body. Remember though that I just finished working with monofilament thread where I reduced top thread tension to almost nothing. Now I'm moving to a 40 wt thread that will require me to return top tension to somewhere around middle of the road. So don't forget to test thread tension on a play sandwich before working on your real piece.
I'm choosing to begin with the yellow body using simple graceful near straight lines. Why nearly straight lines???? Mostly because I know the water background will be full of curves/waves. The minds eye will appreciate something more simple in nature.
You'll see here that since I started in the center and worked one direction outward, I'll need come back and continue working from the center outward to the left.
Time Out for me...
I come to Sedona each year for 2 reasons: 1)Exclusive time with my art and 2) Time with the spirituality, energy, and inspiration that lives in this jewel of nature! So, I need time out to go do some of No. 2. The sun is now out and spring abounds. Til later

Saturday, April 24, 2010

First Day accomplishment

This may not seem like much but if you've ever tried to set up shop on the road, you know it's always an adjustment. I got backing pieced, starched, and ironed. Then I cut batting and smoothed it across the resort's bed to 'relax.' While it relaxed, I did a bit of grocery shopping, and minimal sightseeing as I'm committed to get moving. Finally, the big challenge is the pinning without the normal workspace.... but I think it's done okay.
This piece was painted last summer in Mexico.... My Kind Of Dragon.... the Australian Sea Dragon. I like it for 3 reasons I can think of. 1) It's not a scarey dragon. 2) It's more colorful than the sea dragon we see in southeast USA, and lastly... The male sea dragon helps with family care. YEAH!

It's like taking out a free insurance policy against accidentally quilting in excess backing by taking 5 minutes and rolling the backing around front and pinning it to the excess batting. You'll be glad you did!

Have Car Will Travel

I finally broke down and got a special license plate. It's on the car for this Sedona trip.
I had to do it... my hubby has had a special plate for years. He's been a distance runner since he was 14 years old. Years ago, his grown daughters gave him a plate....RUNRDAD. He's now 70 and still runs 5 miles a day. He'll be here next week running through red rock country.

Friday, April 23, 2010

Road Sign of the Day

The drive from Southern California to Sedona, Arizona offered interesting nature views AND road signs. On I-10, some 16 miles out of Blythe sits a road sign displaying the following words!

STATE PRISON next exit.
Do not pick up hitchikers!


What does that say about their confidence in their security procedures?! HMMM.

Thursday, April 22, 2010

SEDONA Bound

It's been a year next week since I've visited Sedona, Arizona.... A quiet spiritual place of nature's grandeur... Red rock and soil.... green trees.... breathtaking beauty. I will go there to quilt and photograph for a week, then my hubby will join me for a second week. I have to get packing... I have an all day drive tomorrow... but I'm excited. I can hardly wait. I found a video I took last year as I left town. Now you know where I'm headed tomorrow.

I'll be posting from Sedona....

Stabilizing raw edges

So, we have blocked, squared up, and trimmed edges of a quilted piece to be faced rather than bound. I like to run a stabilizing straight stitch just in from the freshly trimmed edges. The sooner the better before loose thread ends begin to emerge from the trimming just completed. BUT... before that, loosen the pressure on your pressure foot. If you leave it in a default setting, you may well stretch out the blocking you just completed. So...loosen up, my friend! :-)

Next... straight stitch just inside the edge. Try to keep it no more than 1/8 inch. Skinny is good!

Wednesday, April 21, 2010

Definitely - BE SQUARE!!!!

I've posted this finishing process before (May 2009,I think) but it is so vitally important, that it's worth a repeat as I work this process on this quilt. I've worked in a number of judging rooms and can't count the number of times I've heard judges see and comment the edges of an art quilt as not straight. The quilt is unlikely to ribbon if this is the case. Getting this part right is the first reason we blocked this quilt. Now that the quilt is flat.... we need spend time getting it just right. I first line up the quilt on a gridded mat and select one side to set the first side. I generally use a drafters T-square to mark this line with a marking pencil before cutting off excess.
Once marked, time to rotary cut.
Time to use that old.. measure twice ( in this case 3 times).. cut once. from the freshly cut edge, measure at upper, middle, lower edges to get the opposite side marked, then cut.
The same need be done for the sides at a right angle to what is done, making certain the first side cut is really at a 90 degree angle to the already cut side. Measure measure measure.... then cut.

Believe it or not, once all four sides are trimmed... again measure for the exact same measurement at upper, middle and lower edges of (in this example the long side of the quilt.)
Now measure 3 ways on the opposite side.
Hairline sized corrections might be needed but party and move on if all measurements are good. YEAH!

Tuesday, April 20, 2010

Really... 48 Top Threads

I've quilted many pictorial quilts but never before now kept track of how many top threads were used. Because I've been asked such a question about other quilts, I figured I'd do it this time. Well, while the quilt top is drying in the BLOCKING stage, I wanted to tidy up so before putting all these away, I found there were 48. Surprising, even to me. Next up...we'll trim and square up the quilt.

Monday, April 19, 2010

Yeah... A Block Party at last

Finally all the quilting is complete. Next step... block this quilt to become flat!
That involves having a clean ( usually a bed sheet used) cushioned surface you can pin your dampened quilt to. For me, the cushioned surface is a custom big board ironing board that fits over a wood table. That's my surface for this quilt. But know that some carpet works, or even a piece of insulation foam board used in construction. The idea:
1) dampen your quilt and 'smoosh'(a technical quilting term :-) it out flat pinning it to the surface with strong pins like floral pins or T-pins.


That done, I allow the piece to air dry in place. If you live in a slightly damp climate, I've seen quilters use large fans to move the air in order to permit drying. In California, I'll leave this pinned and drying overnight.

Sunday, April 18, 2010

Paper and Corn

Whew... I am almost there.... I have about 2 square feet of plain old dirt left to quilt.
On Thursday and Friday.... paper and dirt to the left of Maria's box.
and then..... dirt and corn husk to the right and below Maria's box.

On Saturday, I spent the day teaching at Sacred Moondance Quilt Shop in Lake Forest Ca..... An exceptional class of students. Pats on the back and many high fives were definitely called for.

Thursday, April 15, 2010

New Class for the Hawaii Cruise

I am excited about this ... I've just added this class to the Sept/Oct worldofquiltstravel.com company cruise to Hawaii. This can be a powerful experience. It will appear on their website once other teachers info is available:

Thread: The Linear Paint (Quilting Line and Choosing Color)

Ever see a quilt where the quilting greatly enhanced the result? …or… See a quilt where the quilting did little or worse yet diminished the overall beauty of a quilt.?
This teaching workshop is designed to create confidence in 2 areas: 1) For both ‘topper’s (those that hire out their quilting) and quilters alike in deciding what kind of quilting patterns will positively support their quilt top. 2) How to use thread color as part of their design plan. To apply class learning, students have the option of bringing an unfinished quilt top or a large photo of their quilt top in order to design a quilting plan that could either A.) go with their quilt for collaboration with the hired quilter) or B.) become their own design plan for quilting. We’ll have a few laughs too!!!

Wednesday, April 14, 2010

From PGA West to Pass the Peas please

Back from 2 days at PGA West in La Quinta, home of the Bob Hope Golf Classic. NOPE..... I don't play golf, but I was at their clubhouse doing a privately sponsored Portrait Class with 8 wonderful women. What a wonderful (and warm) place..... but alas, back home last night to the mountain cold. I am still working the background of the Ecuadorean girl Maria. I finally got out of all dirt to where I had a few pieces of veggies to quilt. Peas... just peas. Photo angle slightly distorts... Sorry! Click on photo for closeup. A few more days and I'll be doing the finishing touches.

Saturday, April 10, 2010

Yeah...My Pillow is Done!!!!

I spent the morning with paperwork for my upcoming annual retreat (May 21-24) (www.pattsretreats.blogspot.com or click on the retreat link on upper left). This afternoon was play time for me and I finished my Hawaiian Applique we've been seeing over the last week and made into an oversized pillow and put it on my guest bed. I'm a happy girl. I think it looks pretty nice. I bet I don't have more than 8 hours into this . Whoo Hoo!
I had purchased fabric with which I planned to bind the pillow edge, but decided with the very busy (and real deal)applique bedspread and pillow cover, it might be a bit much. Oh well... more for the stash! Click on photos for closeup. Happy weekend all.

Friday, April 9, 2010

DUH... Why Didn't I Think Of That?

This has nothing to do with being a quilter but I'm a quilter and this made me happy. It's Spring and I'm trying to clean and organize bit by bit. Yesterday was all my paint cans. I have so many. Each can is scribbled with things like... living room ceiling-flat.... kitchen walls-eggshell, etc. With so many cans, it gets confusing. >
A friend Phyllis Reddish shared this clever trick for keeping track of whats in what room even if you don't have any spare paint. In each room, behind a wall plate.. just write it such than when the wall plate goes back on, it's out of site. I've been on this planet a good while... I never thought of that. Very smart!
Thanks Phyllis.

Thursday, April 8, 2010

Student Beth... Take A Bow

I can't tell you how thrilled I am when a student sends me pics of completed projects began in a class. This image began with one of my patterns and a CD/DVD training package on Simple Thread Painting specifically on this image. So Beth Stanton took a class with me, took the thread painting CD/DVD home and look what she did.. WOW... I am impressed.

With her approval, here's Beth's pictures and comments:

Hi, Patt -- thought I'd share a couple of pictures of my version of "Take a Bow" that I started in your class at Road to California. I just finished it this last weekend and am really happy with the results.

I don't know if you remember but you demo'd the watercolor technique on the foreground on this and by the end of class it had dried and was too light and I said that I'd work on it at home which I did and, in my opinion, got it just right.

I also did some additional dark background work when I got home and got a HUGE drop of the dark blue ink on her skirt. Okay, so I'm exaggerating a little bit, but the drop was at least 1/4" across. Thank goodness it was in a spot that I could cover up with opaque white and turn into a flower...can you figure out which one?

I was a bit concerned when the thread painting distorted the skirt section so horribly that I thought I'd ruined my pretty painting, but your video said that I'd probably see distortion so I kept going, hoping beyond hope that it would work out, and it did! I think she's beautiful even if her arms and the top of her legs are a little wrinkly (see the detail photo). I have a plan for the next project that I hope will lessen that.

I enjoyed the class immensely and hope to start working on one of my own photos soon. Thank you!!

Beth Stanton
Wrightwood, CA

closeup

Wednesday, April 7, 2010

Hawaiian Quilting by machine

I hope the Hawaiian Quilting Police doesn't find me for 1) painting my applique and the 2) quilting it my machine rather than by hand. Some ancient Hawaiian princess is likely rolling over in her grave.
Quilting this piece by machine is pretty fun as I will stay with the traditional echo quilting pattern which is pretty straight forward and requires NO marking... not my way anyway. Click on image for closeup. I think it's lookin' okay.
(C)
Much like traditional applique,,, I did a matching color stitch at the very edge of the painted applique. It further crisps up the edge to my thinking. minimal same color quilting about a third inch inside the flowers and leaves to frame things up a bit more... kind of like my old pillow.

Tuesday, April 6, 2010

Painted Applique

'Taped down that quartiled drawing, added a slightly thicker fabric over it ( this time a prewashed cotton sateen but could be like a kona cotton). Prewashing fabric will remove some of the sizing placed atop fabric before they put it on bolts. They want it to look great so we'll buy it. Removal of sizing allows ink to better penetrate the fabric surface.)

Since I will be solidly painting areas with ink right out of the bottle, I think a thicker fabric will permit greater color saturation without promoting bleeding. Though I seldom transfer a drawing from underneath to the surface of the fabric... for this very precise image, tracing with an ink marker seems smart. That done, its a matter of carefully inking the image.


A few things to remember with this kind of work.
1) Avoid distractions ( eg. no TV, overlapping visiting with gal pals) and Go slow
2)To avoid careless errors, take breaks often
3)Place a clean piece of paper or fabric inderneath where you rest your hand to avoid any smearing of ink


This whole painting took less than 3 hours... with multiple breaks included. A needle turn applique of this image would take at least 10 times that if not more.. plus the points on these leaves... well... even though I've gotten much better at traditional applique. I don't know that I could pull these off. I love painting!!! :-) Taking a break.. then to quilt

Monday, April 5, 2010

Hawaiian Applique the EASY no applique way

The previously shown Plumeria may well deserve some additional quilting, but for now, I need to get the long awaited Hawaiian applique without any real applique sample done for a cruise project sample. I've wanted to do this project for a long time anyway. I 'knew' it had to be possible AND I wanted a cruise class project that didn't cost much. ( Vacationers need their money to go on excursions/ and shop.) So, I created this project that will require a piece of fabric pillow top size, 1 bottle of ink and 1 marker. YEAH! First to create a pattern..... Well over 10 years ago, I made my very first quilt. It was a needle turn Hawaiian applique pillow that was hand quilted.. It took weeks and I did a terrible job... BUT I love the clean crisp look of Hawaiian applique and I bought a quilt for my bed. ( uh um... I am missing an arm and leg for that purchase? Just kidding... kind of! )
For this effort, I want to start with a hibiscus flower like my pillow and then change it up at the top and in the middle a bit to be a 'little' more contemporary. So.. I started by drawing 1 half of a flower and leaf.
I should have shown you the original pillow and I drew 1/2 of a flower( with a few changes) that is on this pillow.. notice I didn't provide you any closeups as my work then.. well... it sucked!!!
You may have noticed the 1/2 flower/leaf drawing was on a triangular shaped paper... (actually a piece of non waxed sandwich paper). Since Hawaiian applique is much like creating paper snowflakes where one shape is like another in reverse, I then folded my tissue backwards so I could trace the drawing I'd made on the other side.
Now you have one quartile of a pattern. Make 4 copies of this drawing and tape them together. You have a full size pattern. Yeah!
Next to paint my applique. I see there's a hint of ink on the paper.... Now you know what color I am painting this piece. News later. I have to go to court now and fight a ticket I trulyyyyyy don't deserve. Cities/States are eagle eyed for any possible 'maybe' infraction as they need money and have raised fines unbelievably high. I got a $446 citation for a much delayed entering an intersection against a red light ( no traffic in sight in any direction by the way) with the red light stuck on red both directions. Be careful. I'll spill my plight later. UPDATE: Officer didn't show up. Case dismissed! ....and I was soooooo ready! Note: at least half the officers for cases on the afternoon docket didn't show up. There's a lesson there... always show up if you are the traffic citation defendant. If you don't show up even if the officer doesn't either.... you forfeit the cost of the ticket. Interesting stuff!