Friday, September 30, 2011

Just Use The Fabric As Your Quilting Motif

Old habits sometimes justifiably DON'T DIE! In this case, it's good! When I started machine quilting in the late 90's, I was mostly self taught and my self-training experience embedded deeply into my wee brain. I used a couple of detailed $3.86 printed panel "cheater cloths" made into a quilt sandwich , loaded my machine with clear monofilament top and bottom ( so my boo boos wouldn't show so badly) , and free motion quilted the "OUTLINE" of every possible element of each panel... I mean every flower, flying geese, star block, filler square,triangle.. I mean everything!!!! By the time I finished, I had a good feel for free-motion. It's not nearly as difficult as our non quilter fear makes it out to be.
That was a long ago beginning for me, but I've kept them as a reminder to "just try stuff." Sometimes the magic works! ;-)
... The lesson to bring forward today is... 
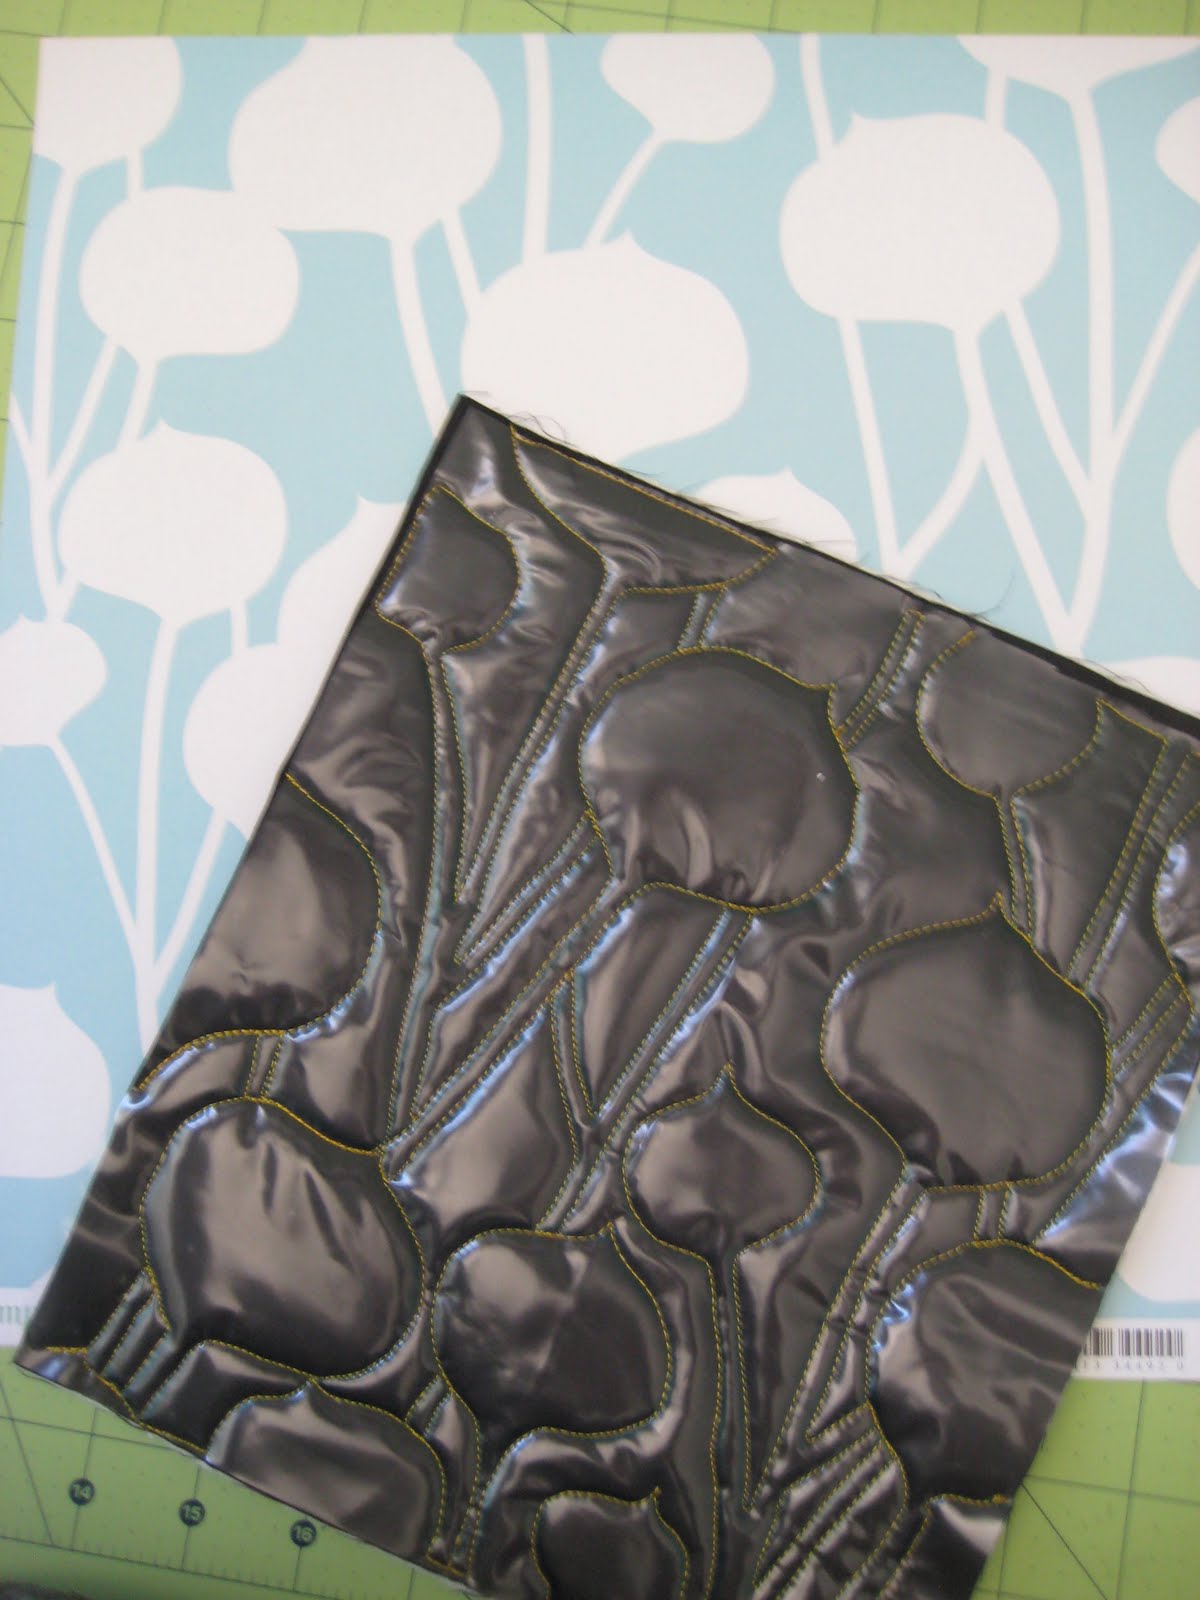
sometimes the printed fabric can make a fantastic quilt plan. Case in point: I know it is September, but I am working on a Christmas wall quilt of one of my ink paintings of "Santa's Secret." I chose a 'fancy'border fabric for this quilt..and I didn't buy alot of it months ago when I planned this... ( I wasn't sure I'd like the fabric because it is a reflective nylon blend ( like flag twirlers use) over which is printed a metallic gold motif of holly leaves and berries and such. It was surprisingly easy to quilt so wish I'd bought more for future use. The quilt plan motif on this piece is the OUTLINE of the metallic gold images( I chose a red thread to disappear into the background). It take a good while to quilt this way, but it's pretty easy, even relaxing, and makes a spectacular finish.
Santa is all but edge bound here... I think he's kind of cuddly!
I'm teaching a class on the painting of an 18" x 24"ink image of Santa's Secret at Houston IQA in November. Students will get a take-home step by step photo/text instruction too on how I quilted each area.

Thursday, September 29, 2011

One More Water Soluble Idea

I've become obsessed with this experiment phase of looking at non traditional sources for quilting motifs. I have to stop playing but it's kind of like eating potato chips.... "Just one more" I keep saying. Here I found this scrapbook paper of an interconnected/overlapped stem/leaf pattern that might be great on a nature oriented quilt. The plan... same as before, using a fine tip permanent marker, tracing a pattern atop a piece of water soluble stabilizer then quilting on the traced lines before dissolving the stabilizer.
In this example, I stitched atop black fabric though have left the stabilizer on still as this is a sample for an upcoming quilting forum. Notice how 'shiny' the stabilizer is. It is because it is a medium to heavy weight one... i.e. thicker. This can be dissolved, though it's more work than the lightweight stabilizers shown in earlier postings. I've tried dissolving both, and much prefer the lighter ones for this process.

Wednesday, September 28, 2011

Rubbing On A Quilting MOTIF

I love working with rubbing plates and even natural surfaces when I'm adding textures to my paintings, but DUH... it only now occurs to me that I might purposely use a rubbing plate for a quilting pattern motif. I just grabbed a plate that was 1/2 wood pattern, 1/2 brick pattern.
In this test, I used my Tsukineko Transparent Inks atop a piece of light valued modeled fabric ( a hand dye ). Placing the Rubbing plate underneath the fabric, then using a brush tip fantastix fiber stick to rub across the fabric surface and create an interesting surface design.
Once dry/ heat set, it can be used as 'the plan' for quilting.
The brick pattern worked too.

Monday, September 26, 2011

Stencil Your Quilt Pattern?!?!

Sometimes, a stencil might be the ticket to not only add interest to your quilt top, but also serve as the quilting pattern itself. In this example I'm using a Shiva paint stick, stencil brush, and open area stencil atop fabric.
Placing some paint stick on a palette or better yet a piece of freezer paper that can be later tossed, scrubbing the paint stick material into the stencil brush, then securing the stencil while scrubbing color through the stencil and onto the fabric.
When all is stenciled on, remove the stencil and wait the prescribed drying time ( Shivas call for 24 hours)
After the paint stick dried, I outline quilted the stenciled area, micro stippled open areas inside the stencil, then added simple straight line structured quilting outside the stenciled area.

Sunday, September 25, 2011

Non Traditional Design Sources

It's fun to look for other ways to create quilting plans... There are a ton of design books out there.
Sometimes there are simple designs that seem to work. Here's one using the tracing on water soluble stabilizer.
Add atop fabric and free motion stitch. You'll get a perfect match to the design in the book.
Follow the directions for dissolving the stabilizer and the result is a precise match to the book design.

Friday, September 23, 2011

Block and Tackle Ben

This may be the most important part of finishing a wall quilt. It's a bit scary too, not because you'll hurt anything, but because even when you've been careful to evenly distribute quilting, this is the time you find out if you did a good job. If you didn't, blocking helps but may not solve the entire problem. I have a piece at Houston in November that got an Honorable Mention which is better than I thought as "My Kind Of Dragon" could NOT be blocked as flat as what I felt would be competitive. I was right. Live and Learn!!

So... I block my quilts once for sure (at this stage prior to binding or facing), and sometimes even after all the finishing work in complete. So.. here's how I go about it. First, I'll be doing this on a padded tabletop, but I've also done this atop a sheet over carpet, or atop a hard bed covered with beach towels.

In this case, Ben is smaller that the wood table for which I had a big board ironing board made... not really for ironing.... but for this stage.. blocking! It drops on atop my work table. It is padded with batting and covered with a strong cotton. Once Ben is trimmed/ relieved of excess batting and backing, I lay him atop the padded board and spray him pretty wet... then the game is "smoosh" it flat and pin on all edges before allowing the whole thing to air dry.
He got really dark when wet.... I even felt obliged to add pins to his snout area. He looks like he is being treated by eastern medicine needle therapy.

Tuesday, September 20, 2011

Using NON Quilting Media for Quilting Templates

I'm prepping for a quilting forum on this subject and have created a few samples to reflect related ideas. I'll post some of them over the next week or so. This one... from a last year quilt titled Proud Heritage called for an elegant but subtle background for a spanish folk dancer I know. I wanted something akin to flocked wallpaper but with more class.... so I found a flourished scrapbook paper with the 'answer'.
I then created a simple (traced) black and white contour drawing over which I placed a sheer water soluble stabilizer. Using an ultra fine permanent sharpie, I traced the drawing onto the stabilizer.
The above stabilizer process will be repeated as needed.
I pinned the stabilizer to the quilt top and outline quilted the image carefully following the drawn lines.
I tore off the excess outer edges of the quilting outline .
Then following the instructions, I wet and dissolved the stabilizer away, allowing the quilt top to dry before proceeding.
The rest was easy.. some tiny micro stippling around the outlined image and the results speak well, I think. The 'knocked down' background makes the outline quilting look much more difficult than it actually was.

The finish is one of those backgrounds that judges like... It was a surprise finish they didn't see from a distance...like here. Judges like nice surprises.

Monday, September 19, 2011

Am I lucky or WHAT!?

I just attended my monthly meeting with my Wanabe Quilting Friends. I came home with this beauty... a 100% hand appliqued wool on wool "bed rug" that friend Mary Lou Ripper finished after having bought all the finished, but loose blocks and remaining kit for $40. at a guild UFO sale. WOW! Mary Lou finished it, and realized that someone who lives in snowy winter mountains should likely enjoy this more than she could where she lives. So I get this beauty in exchange for some quilting of one of her quilt tops. What a gal! I'd had it less than 24 hours and took 2 naps under it already!!!

Sunday, September 18, 2011

Ben be done!

Done quilted anyway.... I finished the left side cheek to match the right, and turned off my machine. I have a lot of stuff going on this weekend, but by first of next week will get to blocking Ben flat. It has been fun for me to see the change in stature/mood as I've worked on him off and on. In the early stages of painting in late 2008, he was plain scary. A softening of eye color completely changed his persona. He also seemed younger when I began... but ofcourse both he and I are almost 3 years older... Egads! At the finish here, to me, he is sort of a big lug... not too scary, but you know he has power if he really needs it. He definitely could benefit from a couple cucumber slices on his poor swollen looking under eye bags.
Note: (c)

Click Here to see the 2008 beginning of Ben.

Friday, September 16, 2011

A Cheek to Cheek Balancing Act

Remember I said I seldom mark anything before quilting. I must admit sometimes it does help keep you out of trouble to do a bit of marking. I quilted down the right cheek to the bottom of Ben's face...continued under the lip area headed for the opposite cheek and realized I was starting to develope a direction of hair pattern that if continued would imbalance the frame of Ben's face. So I stopped just under the edge of Ben's lip and brought out my Conte pastel chalk pencil again. I loosely sketched in the direction of flow I wanted to compliment the opposite cheek area.

Now starting again at the higher arch ... I set up the quilting pattern to keep going back down to below his lip.

Wednesday, September 14, 2011

Sweet Cheeks of Ben

Finally... the back of the head is pretty much quilted and I can move on to the lighter value cheek area. The photo below is the unquilted left check.

Secondly, the quilted right cheek using a variegated black,grey,silver 40 wt poly thread. This goes much faster than the back of the head pattern. It's mostly a mild elongated back and forth S curve taking advantage wherever possible of the thread value change.
Much more to do... but he's coming along.
Note : (c)


I must admit I got tired of quilting.. I have lost count of the number of monofilament bobbins I've already used. It's beyond 6. Considering a queen size bed quilt on my long arm uses 6 oversized bobbins of 40 wt thread for an entire quilt and a single monofilament bobbin holds 4 to 5 times what a bobbin of traditional thread would hold, it's no wonder I'm hearing the hmmm of my machine in my sleep. I feel better this afternoon as I took a break and cleaned 3 kitchen drawers for a sense of accomplishment and completion.

Tuesday, September 13, 2011

The Basic Background Pattern

I admit I lost lots of sleep thinking about how to tackle this... then, I awoke one day sure I had a good plan. That gave me permission to start... and dang... I didn't do what I'd come up with as it quickly became evident this was a better choice... the choice being an almost leaf-like filler pattern made up of a central ( to the leaf) elongated spike surrounded by a slightly more graceful outer leaf edge that bent at the tip in the direction of growth. As long as this is taking ( especially since I'm going more slowly using black metallic thread ) this seems to work without too much need for preplanning. From a distance, I'm thinking this will work.
He's coming along okay. Probably 2 more days on the back of his head.... then on to his lower/outer cheeks.
Note: (c)

Monday, September 12, 2011

The Background Journey

The background areas of any art quilt always offer a special challenge. Viewers of a finished quilt usually notice the focus areas and are inquisitive about how they are quilted, further wondering how hard was that area, how long did it take, etc. Surprisingly, those kinds of areas seem less difficult only because they are more interesting to the quilter, and as a result, time seems to pass more quickly. In focus areas as seen over the last few posts, each small area is a new problem solving opportunity and are usually finished more quickly than what comes later... thus... more fun! Background areas often take twice as much time as whats been done previous. The stitch patterns are often redundant and it seems like an eternity is spent here in areas less viewed but equally as important. We are in the hair at the back of this silverback's head. I've worked on it off and on for days and have at least half yet to do. I'm working with an upside down quilt here starting to add in some silver/black twist as in his brow area.
While I seldom mark anything for art quilting, sometimes a soft conte pastel pencil works nicely to create some general perimeter areas for planned quilting. Pastel pencils show up very well and brush off easily. Yeah!

Saturday, September 10, 2011

Big Plump Lips

If something is really rounded, I often want to use 3 values (light/middle/dark) to give adequate dimension. The middle crease of the lips was already quilted in very dark as it would be in greatest shadow. I wanted to add the 'plump area highlights using a silvery thread.
With the highlight in place, I used a light marking pencil to help me 'stop' the lower lip where tufts of hair come up to meet it.
After that, I used a variegated black/grey thread to represent the bottom edge of the lower lip.
At the bottom edge of the lower lip, I returned to using a silver/black twist to represent tufts.I may need to do more with this later. We'll see.

Friday, September 9, 2011

A Mustache of Sorts

I have no idea what the tufts on either side of the nostrils are called. I tackled this area in 3 steps.
First up, I used the painted fabric as my reference to outline the inner and outer edges of the 'mustache'
Then, I took advantage of the areas of would-be shadow by adding dark ink in those shadowed areas.
Finally with a light silver thread, the highlighted areas get enhanced.

We'll move toward the lips next post.

Wednesday, September 7, 2011

Going for a Heavy Brow

A mountain gorilla has an interesting head shape. They do have a brow area of sorts... it is often lighter than the area around the eyes, so I chose a twisted black/silver thread for this quilting effort. I wanted these brow-like areas to appear somewhwat haphazard, as they would in life, so I was allowed to stitch loosely one hair over another to represent a bad hair day appearance.

Continuing plan of working inside out, now that I have worked upward a bit from the eyes, I will go next to work to the left and right of the nostrils. That will be next post.

Tuesday, September 6, 2011

The Eyes Have It

I needed something more interesting as a quilt line around this guys eyes. We'll see if it works or not, but I am hopeing I can avoid quilting the eyeballs at all.... I like the idea of them being softer/ more unified by subtle transition of color/value. But I did want the area around the eyes to be dark (as set back in his head) and reflect a harder surface than the hair that will follow. The small figure 8 circles... some as small as 1/16" will hopefully translate to a more taunt textured skin.

Monday, September 5, 2011

One BIG Set Of Nostrils

This area of Ben is smooth by comparison to the dark stringy hair-like areas. That said, his nostril area should be void of sharp turns on stitches... so I'm going for some almost graceful meandering and have chosen a thread color/value (40 wt. light grey/silver) that will almost disappear into this quilted area when the quilt is done.


Sunday, September 4, 2011

Back With BEN

Remember my last year painting of my Gentle Giant Mountain Gorilla? He hung on my design wall for sometime and eventually named himself Ben. I have been longing to get back with Ben and get him quilted.... so here goes.
He's got a good sized face... about kitchen table size. He's pinned and ready to go..... I begin by using monofilament top (smoke) and bottom (clear) to secure the perimeter of his eyes, and his craggy wrinkles under his eyes, over the top of his 'nose' and along the top of his cheeks. It's sometimes easier to quilt upside down,
For the really deep wrinkles, I stitched on the outer perimeter of each side of the wrinkle. For small wrinkles... a stitch straight in the middle ( deepest part of the wrinkle) seemed to work for me.
This area represents the very center of the quilt. I will begin to work mostly inside out headed toward the outer edges of the quilt. I will however possibly have some small detail areas that I come back to. Next up.... BENs big nose.