Sunday, November 20, 2016

BIG WOW Wool on Wool

New friend Bev Ziese  of Irvine, Ca has become a star in wool applique. I was asked to quilt this piece for her and what an amazing journey it was for me.  I had quilted wool applique before but never atop wool background, and not with this level of  gorgeous detailed beading and embroidery!  There's always something new to learn.  I chose a thin batting 50% cotton, 50% poly (the poly for holding shape).   Here's a view of the piece as it was coming off the longarm . I want to show you some of the beautiful applique detail following this.
 The are 24 separate blocks on this exquisite wall quilt. EVERY BLOCK is different.  Beading, embroidery, french knots... just beautiful!! Here is a sampling...


 lastly... I love this little acorn! 
Some know I like to use this blog for teaching opportunities.   If you loved these wool applique... they are part of the Jacobean Wool Patterns purchased from ThreeSheepStudio.com. 
Quilting wool?  I knew the stitches would sink into the background wool... and  thus I changed /lengthened stitch length to  only 8 stitches per inch. I think that worked well for me. Many of these gorgeous patterns include beads and embroidery at or outside the edges of the applique. As a quilter... just deal with it.... you may not be able to get as close to the applique as you'd like for an outline stitch, but so what!!!  My take on this kind of work...  the applique speaks for itself... Don't try to compete with too much quilting! 
CONGRATULATIONS BEV!!!!! 


Saturday, November 12, 2016

"POT" .... Pot Holders ... Why not!

I don't even smoke tobacco much less pot but I got a kick out of this version of my occasional pot holder sewing....  I bought this "POT fabric" last summer in Colorado where pot was already legal.  (jukeboxquilts.com). This fabric pattern is called "Herb" by Alexander Henry. It's out of their 2014 line but shops can surely get it.. especially since several  more states just legalized it.  .... at least Jukebox had it.

So here's the deal.... what you'll need and *what you'll get ( * finished pot holder upper right side of pic below. )

To make 1 super functional pot holder... as seen below you  will need:

3  10" squares of a novelty fabric or at least matching fabric.  (2 of which are folded over right side out triangle shapes of pot fabric in the picture below)

2  10" squares of contrasting fabric ( exampled by triangle -folded black below)

2 10" squares of mostly or all cotton batting  
OR
1 10" square of thermal isulated material PLUS 1 10" square of mostly or all cotton batting.
(I've made both ways and both work fine)

1 scrap square of novelty fabric ( appx. 4" x 4" )


Start by layering the 'batting' layers as shown... , place the scrap fabric in the very center.

and stitch it through .. all around it's perimeter . It makes little sense right now but this scrap fabric will be directly below the 4 fabric triangles when they are added and turned inside out.  You'll see.
So now turn this fabric side down on your work surface.
This may seem odd... but next comes the 10" novelty fabric placed directly atop the layered battings.  
Now you take those 2 of each fabric right side out triangles and "weave" them atop the 10" flat novelty fabric...   Below are the first 3  triangles put down and then to place the final triangle, will require pulling back a corner to set in the final triangle. Skip down one more pic. 
Final triangle in! 

We're getting ready to stitch through several layers so PINNING  
to secure layers will be very helpful. 

Adjust ( lighten) the pressure foot so things will move easily through.


Stitch the entire perimeter.
You are about to turn this deal inside out so snip  excess bulk at the four corners
There's not an easy way to still photograph the inside out process...  Just do it.... and the result is the ( in this example) the 10 inch POT fabric  is now on the underside of your pot holders.. the folded triangles now on top .
To use as a true pot holder with a good grip...  one can literally slip a couple fingers through the center opening of the folded triangles.  It's a mighty good HOT Pad  for food dishes too.

Thursday, November 3, 2016

O.. to return to Venice

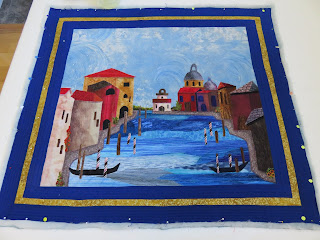
Friend and fellow artist Larry Tinsley  interpreted the  grand canals of Venice  in 'raw edge' appliqué. Yes.. he loves Venice.  I do as well and hubby and I  hope to return someday. Larry's fabrics were carefully and beautifully chosen/ placed. Lucky me, I got to quilt it for him.  I LOVED his fabrics so whatever I did in the quilting, it HAD to support his fabrics and NOT get in their way.

Believe it or not... many of the buildings had such interesting textures in their fabric surface, that colored threads atop would have been distracting. I chose to closely quilt them.  The closeness of the quilt lines made the building look flat/ hard ( as would be the case of old world buildings) .... and.... as importantly they were  quilted with ever so thin monofilament or in some cases 100 wt ( REALLY thin)  matt finish poly. Seeing the thread  at a distance was just less important.

The commercially printed sky fabric was unusual... some circling brush strokes like swirling wind... and lots of little bits of cloud here and there. Never seen a sky quite like it.  Thats the fun part of quilting.  The ever looming question in quilting.... HOW DO I DO THAT AREA justice????  
 (Click on photo for enlarged view)
(c)  VENICE 29"L x 32W

Larry 'framed'  his scene  is blue and gold. Plenty of straight stabilizing quilt lines were needed both visually and to eliminate potential for surface distortion. ( You may note I am not using a walking foot for this... instead, I'm using my 1/4" foot  and have reduced the pressure on the pressure foot so I can stitch easily without 'stretching' the border fabric.  Beside... I can use the side of the 1/4" pressure foot as my stitching guide for the 'next' line to it's right.
 Using gold thread... a traveling scroll line further adds to border stability AND  reminds me of the old world elegance seen in this breathtaking city.
Last...  After all the handling involved in the quilting process, I like to dampen/ pin/ and air dry to block perfectly flat.( I circulate air with a fan in the room  though not pointing directly on the quilt )
 Pins are out and Quilt is in Larry's hands for binding.
(pattblairquilting.blogspot.com)