Monday, April 29, 2013

Creativity in Sedona

Have been traveling a few days in sheer delight. 1) Was in Sedona Red Rock Country 2) Was in a private studio portrait in oils class with a world class instructor ( I get to take a class now and then too.) and 3) I took friends to the class too.  I piddled in oils years ago ( I mean 4 or so decades ago without instructions. It was okay but I learned to love watercolors more ( the medium that eventually brought me to painting on fabric with inks).  NOW.. there are water mixable oil paints ( YEAHHHH!!!!) so I might find the best of both traditional painting with water and oil.  I will NOT be departing from inks on fabric.... This is just personal fun!!!!
Established oil painter Gretchen Lopez of Arizona sets up  model "Mel" for a value sketch warm up.

Value studies call for a study of the shapes involved and the locations and intensity of darks. This is a getting to know your subject experience, discovering your understanding of the models planes, core lines, etc. Oh.. my head hurts already.
 So.. those things we see in portrait education books really happen. .. yes a 3/4 view of a head does fit inside a box if done right.
The painting pose is set, and here we go. This will be a "big brush"painting done fairly quickly... i.e.   a loose painting looking for the feel of the model... not so much an attempt at completely accurate realism. This whole effort for me is about loosening up .
First blocking in shapes of darks ( no redrawing the subject on canvas)... we are drawing as we go using a No 10 flat brush ( thats big).Really important learning for me...  Quick sketch and refine... Thank you dear Lord!!  You can wipe off wet oil paint.  YEAH!  I  later took off the dark background angles of her forehead and chin to correct the basic drawing. Darks go on 'thin.' So many of you probably know this stuff... It was new to me. Scary but fun!
This is where I was at the end of about 2 hours  actual painting time. I'm almost done with her face, and have begun the hair.  Background will be last I suspect.   Models need breaks every 15 minutes of so.  Their work is hard.  I leave class at the end of the day with this canvas as is and a reference photo I can use to finish hopefully soon.  New model and challenge the next day.

Thursday, April 25, 2013

Quilting My Asian Inspired Collage

I created 2  collaged tops 2 weeks back so I need to get to quilting.  Remember this Asian Design from earlier posts?

Click Here  to go to initial surface design post.
 Some papers attach ( matte medium glue) better than others.... This strip of gold paper seemed a bit stiff and bumpy so I decided to stitch it down as I didn't want it to draw the eye on the finished piece.
 The background fabric is also there only to suppot the added images... That said, again I didn't want to draw attention to the quilting patterns on the background so I used a nondescript  small meander.
 I did echo quilt around  the stamped coins as they are fairly small and needed a little extra showcasing.
The soft textile between the paper strips seems a nice texture change but did need a wee bit of securing.


Monday, April 22, 2013

Butterfly and Bird Collage

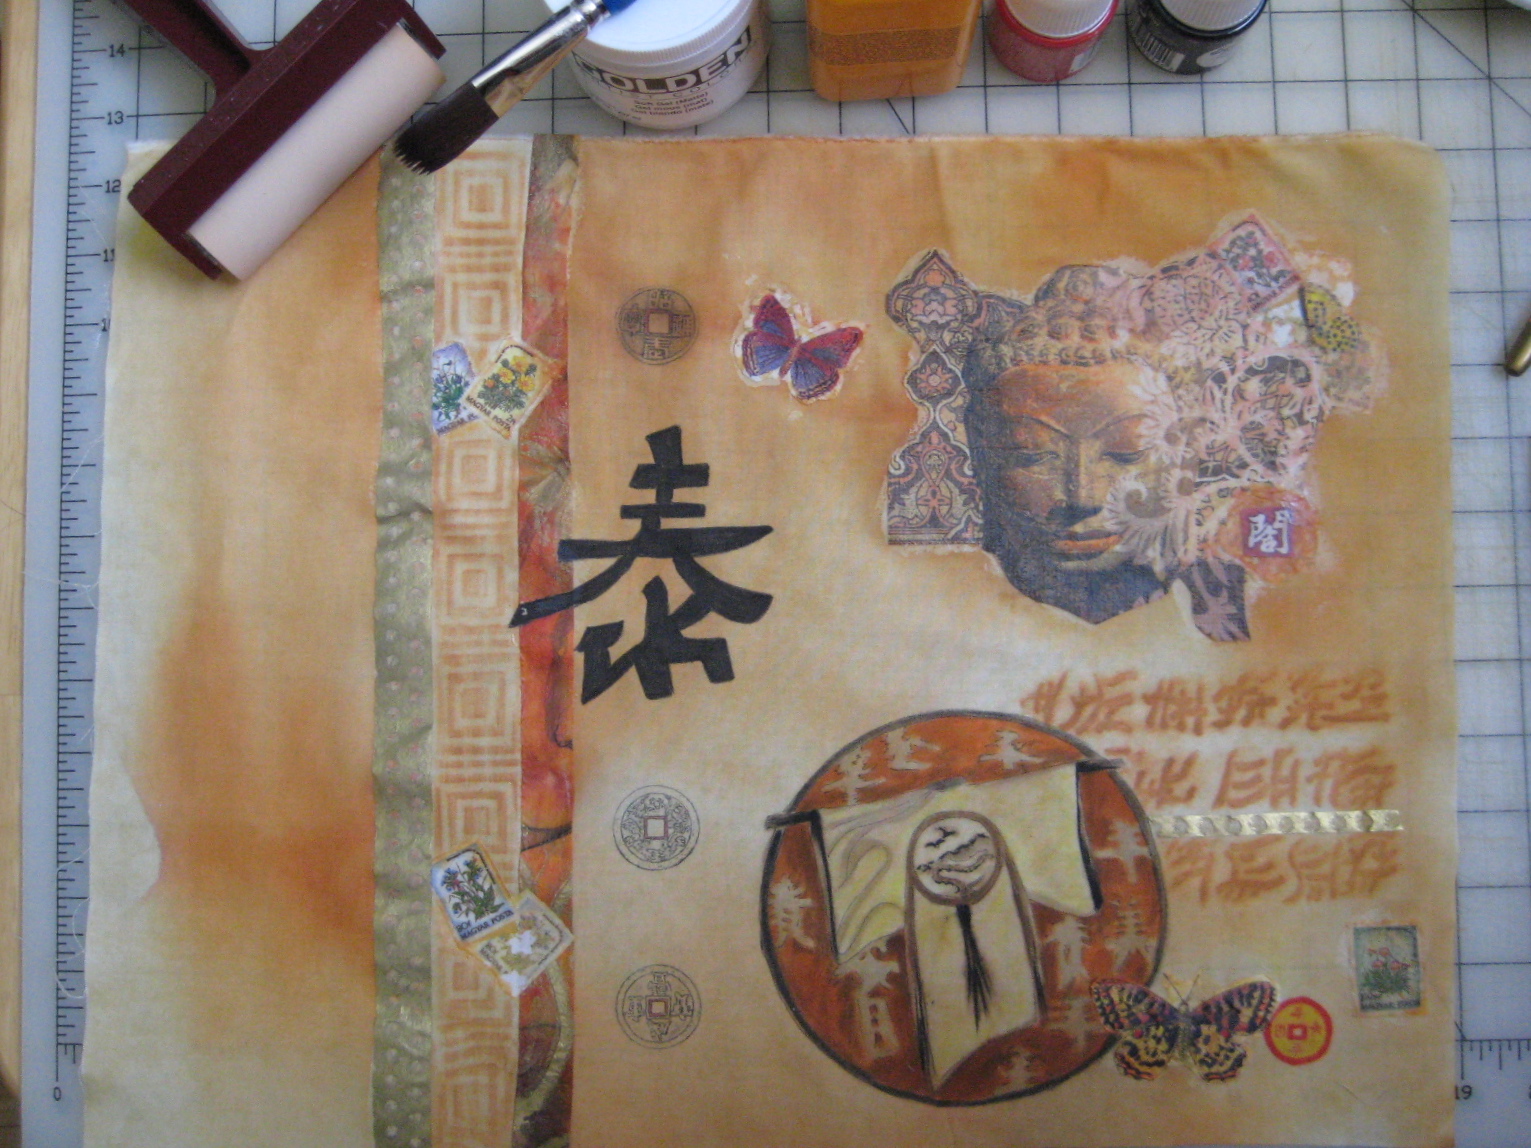
I had one more collage quilt top I made so will show it now before quilting. First things first, I layed out the papers and stamped images I wanted to use. ( Papers are the top layer only of printed napkins or hand towels.  The darker teal on outer edges is handmade paper from the art store.  The bottom soft green flourish is fairly large, so I will treat it with extra care when adhering to the mottled cotton yellow and sage background fabric.


The collage gluing process uses a brush and acrylic matte medium found at an art store.  For smaller paper pieces, I carefully brush matte medium on the back side of the tissue, then place it back side down on the fabric. For larger tissues, it may be easier to carefully brush matte medium on the fabric surface , then add paper. Either way, I brayer ("roll across the paper surface"to get it flat) the glued down  papers before carefully brushing a finish layer of matte medium atop the paper image. ( Be careful NOT to brush excess medium on the surrounding background fabric).  This will dry clear and without a shine.
You'll note I have also layered 2 different paper images using the same process of glueing down the background piece ( the soft sage colored flourish bottom left, and then a blue and yellow bird bottom center.) The 3 huddled chickadee birds are a pigment ink stamp. Something else to do with all those owned scrapbooking stamps.
 
When all is dry, I made a light mix of  brown Setacolor transparent paint to brush here and there creating a more antique look.
This is a pretty fun process all in all.  I do note that as the large piece dries fully, there is a wee bit of surface curl at the edges of the piece.... not a concern when quilting begins....
While I didn't feel the need on this piece, I will often at this stage ( all dry)  use prismacolor pencils to enhance color/values I think will be additive to the finished product.

When quilting begins, you CAN quilt through these  matte medium "glued-on" papers"  I tend to use a smaller microtex sharp needle ( no > size 70) which suggests a thread around 40 wt seems to work well.

Sunday, April 21, 2013

Ruby Santa ... oh so red and fun


 A note from Arizona's Ruby Koch.. THANK YOU RUBY... you know I love to brag about students work.  This is a REALLY fun piece!!!

"Hi Patt: I finished my Santa from the class you taught for AQG when you were in Phoenix.  I love him and everyone else does too.  I put a little glitter on his cap, tassle and cuffs to set him apart from the beard.  It was a learning experience to quilt him (I got a little carried away with dark, medium and light thread- the painter in me I suppose)  I couldn't face the task of inking a background and I just happened to have that piece of red background in my stash.  

                                         Click on photos for enlarged view. 
                                         Close up view... great stitching detail  
                     Overall View... I LOVE Ruby's choice of background fabric.

Tuesday, April 16, 2013

A Discount from Me to You for S.A.Q.A.


Calling all art quilt friends...!  Internationally renowned  Studio Art Quilt Associates (S.A.Q.A.) have authorized some teaching members (lucky me) to offer a membership discount.  Check out S.A.Q.A. at their web site (SAQA.com).   S.A.Q.A. has thousands of members all around the world with many exhibition and growth opportunities.   Should you wish to give it a try, sign up using my authorized 10% membership discount code:  PBW.  

http://www.saqa.com/membership.php?ID=1661 (click here)

and check out their upcoming affordable on line art quilt auction later this year (September) ...at

http://www.saga.com/auction (click here)

More auction quilts will be added as time goes on. :-)

Workshop Fun

This Mixed Media Class was SJVQG's choice so away we go...   I brought a ton of stuff for student use.  Of course I brought the fabric you saw being created a couple posts back... plus specialty papers...
Printed napkins and kleenex .. students used some and donated as well... I think I came home with more than I took. ;-)

plus.....  tissues ( actually skin blotting tissue)  with pigment ink pre stamped images.
Students selected from amongst all of these, brought things of their own as well.... to create mixed media collage atop fabric.   Here are a few snapshots of both maker and quilts in progress.   GREAT people... and soooo  many options on mixed media these days.  One can't know it all or limit the possibilities.  Images were applied permanently to fabric using matt medium.


Getting things dry sometimes takes a good amount of thought... or NOT!
;-)   Such fun!!!!

Monday, April 15, 2013

Best Of The Valley Quilt Show

A beautiful old transformed packing house in Lindsay, Ca has become home of this annual show put on by a collection of volunteers. Friend Ann laughed big time as  three steps inside the door I found old friends in a geography I wouldn't have expected.  Sooo fun!
My hostess Ann Dellavalle's quilt won the Chairmans Award. yeah!!!!!
She was incredibly pleased and I think a wee bit surprised to find a large rosette ribbon on her quilt.
Way to go Ann!!!!!!!!! Congratulations!

A couple things I particularly enjoyed...  this very fun background fill ...

I both liked this overall quilt as well as the individual block.
 I love the gradation of the yellow background...
What a lovely use of  large half square triangles....


Sunday, April 14, 2013

The Day Between

'Arrived in Fresno, Ca area thursday night for a lecture, went to my hosts home late at light, and Friday I awakened to this unbelievable view of paradise outside my bedroom window. Enormous Oaks had been there a very long time.   Such a beautiful and well maintained home of my new friends... Ann, Nat and Pip.... a 9 mos. old border collie.( I already miss you Pip)
I had a day between the lecture and the workshop so hostess Ann, friend Carol, and I headed for a quilt show and stopped  for lunch in the small town of Exeter .  This charming town has local history painted murals on the sides town buildings. A central map (also a mural) tells you each mural location as well as the artist.
Here are but a view murals.... first the exquisite California poppies of Spring.


Beautifully maintained citrus groves... The San Joaquin Valley feeds much of the USA.

All murals relate to local experience present and past...Here honoring  past workers in the packing industry.
As we headed to the car... i spotted these rose blooms almost 8 inches width. So beautiful.
Exeter painted these murals to promote local business. It apparently worked... we stopped for l a lovely outdoor lunch!!!


Thursday, April 11, 2013

Heading North

Car is packed and I'm out the door in minutes headed for the Fresno, Ca area and specifically the San Joaquin Valley Quilt Guild.  Tonight is a lecture, tomorrow a quilt show, and Saturday a Media Mixer Class which should be a hoot.
Here we go!  Beautiful food growing belt!!


Sunday, April 7, 2013

??? Cookie Sheet Fabric

Looks pretty silly but these aluminum cookie sheets have helped me with fabric prep before and clean up is easy, so why not?!  1 yard of white PFD fabric per tray having soaked up a Setacolor paint mixture that will when dry produce a  mottled base fabric for next weekends Fresno, California class called Media Mixer.  It's still quite wet so looks much darker than it will be.

Saturday, April 6, 2013

Color Me Humbled!!

Several weeks ago, I was contacted by a lovely quilt magazine editor Gabi Maier from Vienna. I was honored to have been recognized at all, and even more thrilled when asked if her German language magazine might include an article on some of my work. Pictures sent for her option to choose. Questions answered and low and behold, I learned there would be several pages dedicated to my work.  It turned out to be 7, including 3 pages dedicated to one quilt:  " My Gentle Giant Ben."
Ben can be seen by clicking on the left on the Current News link. Scroll down a wee bit. He's there!

 The magazine arrived in my mail yesterday and what a shock when I opened the package. On the front cover... my piece "Proud Hertitage" which honored local friend and former Padua Hills Theater ( Claremont, California, U S A )  folk dancer: Margie Torrence.
Everything inside the magazine is in German. I feel pretty dumb. I can't read an article about my own work.  I do know how I answered  questions though so I imagine I pretty much know what it says... "somewhere in there anyway."   What an honor!  Thanks Gabrielle!!


Thursday, April 4, 2013

On the Surface

Surface design on fabric is a lot like playtime at kindergarden. This will be a small art quilt composed of  using a  gel matte medium to affix the top layer only of  interesting printed napkins or kleenex (they often have 3 layers)newsprint, and handmade papers. I'll show the whole process in this one post so am beginning with the end result, followed by how I got there.
This surely will be interesting to quilt but thats another day.   I began with a background light value  slightly mottled fabric. I chose an asian theme and began placing napkin parts, mounted and unmounted stamps, rubbing plates in areas I thought might work. 

Once I settled on a basic plan, I began by doing a dry brush rubbing  on unmounted stamps used as rubbing plates using my favorite Tsukineko Inks 

I then stamped the foam stamp on the left, followed by the addition of  ink color within the kimono rubbing just shown.  You'll also see now I've added a few small paper pieces of  butterflies, and postage stamps.  The matte medium is first 'carefully applied to the back side of the paperpiees, then  placed atop/ glued to the fabric.  Matte medium dries pretty quickly after which a layer of matte media can be applied atop the paper glued down earlier. 

To unify things a bit, I've mixed Setacolor transparent paints (buttercup , drop of red, and brown) for a subdued orange paint I've applied  here and there to  the background fabric.  I also used a texture plate designed for borders to place square in square images between the 2 vertical paper strips on the left. 
Last thing I plan on is using a stencil and a shiva paint stik to add some background texture.
 A little stencil scrub work and we are ending where we began. It's will be a day or so before I can think about quilting this as the shiva takes 24 hrs to fully dry.