Thursday, October 4, 2012

3 Dudes Quilting - Phoenix AZ

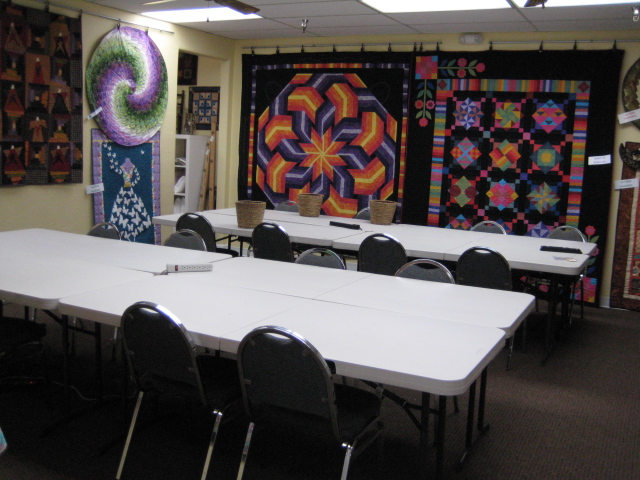
l am here in Phoenix teaching a fusing class for Arizona Quilt Guild. Ya gotta know we are going to have fun with a shop called 3 Dudes Quilting.... This is a spectacular  and large shop.. a must see .
053 East Elliot Road  Phoenix, AZ 85044
(480) 598-8601

 click herehttp//www.3dudesquilting.com to go to their web site.


Ya gotta love the welcome signs at the curb.  Check this out.... this shop comes with gratis iced tea, coffee, sodas, bottled water and an ice machine in a kitchen that comes complete with daily fresh homemade cookies made by Dude 3 (Frank) as referred to by Dude 2 (Jeff). Dude 1 (Ray) seems to do a variety of things and teaches as well.   The cookies alone are worth the trip. But wait... there's more.


The place recently doubled in size... providing a larger nicer classroom.
This shop  is a real treat. The bed, 30's  and checkout counter wall quilts were made by Jeff. Really nice!


We did have a fun class here on Fusing... One of the projects will follow this kind of theme. Pics forthcoming in tomorrows post


Wednesday, October 3, 2012

The street is done.

This seems to have a good look overall.. I have completed middle to far left..west (out of view) of this quilt.  You may notice at the very right of this picture some unquilted areas. I will start from just to the right of the little girls foot (again at center of the  area to be quilted) and now quilt outward toward the right side of the quilt.  In this next effort I will work bottom of the machine toward top again quilting with the quilt in a north south position and I will finish the quilting effort at the 'east most(right) side of the quilt.


Finally... The Street Beneath

While I am working moving from machine top to bottom here on the machine, I am actually quilting a long ( 30+") horizontal area  at the very bottom of this quilt.  Machines are often 'happier ' going up and down as opposed to left and right... so I find it easy to work this way.  I begin in the quilt middle point working outward toward one side.  Starting from one far side and moving all the way across has more opportunity for 'wrinkle in the rug' surface distortion.  

This is a interlocking ' earth strata' design begun with varied lengths of very slight 'S' curves.   ( This is a great thread for this effort  YLI Variations 35wt variegated every inch. Ever so slightly larger than my usual 40 wt choice... It works here and I love the very subtle variation of values/colors for this piece.


The varied lengths above allow subsequent efforts to 'interlock' with previously quilted areas.  This is really a fairly relaxing fill pattern and goes pretty quickly.  Remember to pause ever so slightly when making drastic direction changes. Doing so gives you a sharp point at the 'point' of direction change.  Not doing so will  often give you a sloppy or jerky stitch pattern at the turnaround point.


Monday, October 1, 2012

The Other Adobe Wall

I was away teaching over the weekend so no  postings/pics... apologies. Am now finishing up the left side of my wall piece... another wall of adobe bricks and small stones. I am double stitch outlining stones here.   FOR THE SMALL PLACED STONES ( REALLY OVERSIZED PEBBLES) ... I DON'T PLAN TO QUILT THEIR SURFACE AT ALL.   Not doing so will add a variety of texture on the wall, and since they are quite small... it won't contribute to surface distortion.


For the larger adobe bricks, I continue texture filling with my irregular round plus sharp direction changing maze pattern I label this the "indecisive worm" fill.  I came up with this fill years back when quilting painted asphalt.  It seems to work here too.
This is a vertically long wall  though narrow width wall and admittedly is a couple days effort .

Friday, September 28, 2012

Quilting The Little Girls Stoop

Showing here is the right side of the stoop front. There is likewise an area twice this width on the left side of the little girls, plus the area shown  one set of pics further down below where their feet rest on the ground in front of their seated position.


First.... I meandered the area just beneath the little girls dresses... ie where they sat. Then I quilted the lighter value curved edge.

Lastly... tackling the vertical width of the stoop front.  Because this was a broad wide area, to minimize the potential for a wrinkle in the rug effect that might be caused by quilting left to right ( or vice versa)... I chose to break things into areas... like... starting to the right of the middle of one segment  and then quilt left to right.. and further diving the left side into added quartiles and moved left to right.  I managed to complete the entire  width of the front of the wide stoop without any surface distortion. YEAH!


Thursday, September 27, 2012

Dragonfly revisited a new way

Some of you have seen my sample class option for a dragonfly....

I always tell students at the beginning of class, please change anything you want . Sometimes they do, other times not.  Almost everyone DID in this class. There were such a nice variety of finished paintings. I got a couple here. I call this the Carribean Dragonfly... When I look at this one, I want to take a cruise.!


Then the first ever painted earth tone dragonfly which called also for more muted water colors. Great job Tonya!

I soooo wish I had pics of them all.

Wednesday, September 26, 2012

Beautiful Stuff!!!

Victoria  took my ballerina drawing for her first effort.... Looks great , eh?!


Then began what will be something truly special for herself.  Her own drawing is behind the fabric  such that while she has just begun... you can see the rest of the 'plan' 


This creative teen sews, quilts, runs track, target shoots, and gets good grades. Impressive!