Everything begins with a drawing.. often the more simple the better. I intend to place Father Christmas in a snowy night setting so as usual I begin with a simple drawing ( shown on left saved in a sheet protector for my drawing archive)...pictured for size reference atop the 300% B &W enlargement done at my Printer.
I know I will be placing several small English scenes on his great winter coat. This is going to be a fun journey. I plan to try things I've not done previous so YEAH!!! ...at last a chance to use collected and stored art stash stuff!!!
Monday, December 3, 2012
Sunday, December 2, 2012
Marker/Pen Testing
*I am always looking for new products to incorporate into my work.. Sometimes just out of curiosity, and other times, because I'm not completely satisfied with what I'm using.. thus this test .
I wrote the pen/marker name ( only one of which was made for fabric.. that being Tee Juice) on white PFD fabric... then heat set them with a dry cotton setting.
After that, I misted the fabric with clean water to see what happened. Here is the result.
The 2 that were failures were no surprise frankly.... but sometimes... things can surprise us so nothing in the art store is immediately ruled out 'til I've tested them.
*Staedtler Permanent marker ( tested a black marker) did FINE..a winner
*Le Pen failed.. DARN! I love these little pens... they have a beautiful point on them but definitely NOT for fabric.
*Sharpie ultra fine point marker in a flesh color... surprised me a bit. It did not bleed out as my earlier testing with black markers. I'm always looking for markers for portrait contour drawings. YEAH.. another winner!
*Faber Castell-Pitt pen light flesh color .. a winner.
TomBow flesh color marker...almost completely washed out. No surprise but one can always HOPE!
*Tee Juice Fine Point in a flesh color.. a winner
* all purchased Ultrect Art Supply.. available in stores or on line).
You might guess... I tested these flesh colored markers for a good reason My next piece will have a portrait element to it.
I wrote the pen/marker name ( only one of which was made for fabric.. that being Tee Juice) on white PFD fabric... then heat set them with a dry cotton setting.
After that, I misted the fabric with clean water to see what happened. Here is the result.
The 2 that were failures were no surprise frankly.... but sometimes... things can surprise us so nothing in the art store is immediately ruled out 'til I've tested them.
*Staedtler Permanent marker ( tested a black marker) did FINE..a winner
*Le Pen failed.. DARN! I love these little pens... they have a beautiful point on them but definitely NOT for fabric.
*Sharpie ultra fine point marker in a flesh color... surprised me a bit. It did not bleed out as my earlier testing with black markers. I'm always looking for markers for portrait contour drawings. YEAH.. another winner!
*Faber Castell-Pitt pen light flesh color .. a winner.
TomBow flesh color marker...almost completely washed out. No surprise but one can always HOPE!
*Tee Juice Fine Point in a flesh color.. a winner
* all purchased Ultrect Art Supply.. available in stores or on line).
You might guess... I tested these flesh colored markers for a good reason My next piece will have a portrait element to it.
Thursday, November 29, 2012
All in Port!!!
Now to heat set, trim, and formally photograph for the class description. This is going to be one fun class!!!!
I hope I can get this quilted before Road To Ca. in January... I'm afraid I have 4 quilts to complete in front of this one. ;-)
Wednesday, November 28, 2012
Painted Quilt Blocks
When I envisioned this piece, I always thought it would be fun for the class artist to add to their quilt, fabric printed photos of their trip. So the blocks on the drawing are set up to allow that, but as a class sample or also as an option to those who wish.... I'm adding some drawings of traditional quilt blocks. Students can use these or ignore them. Their choice!
This was all done with markers.. It was just easier! A neutral colored outline of each block seemed to finish off block edges. For this.. a ruler and writing tip marker were helpful.
Tuesday, November 27, 2012
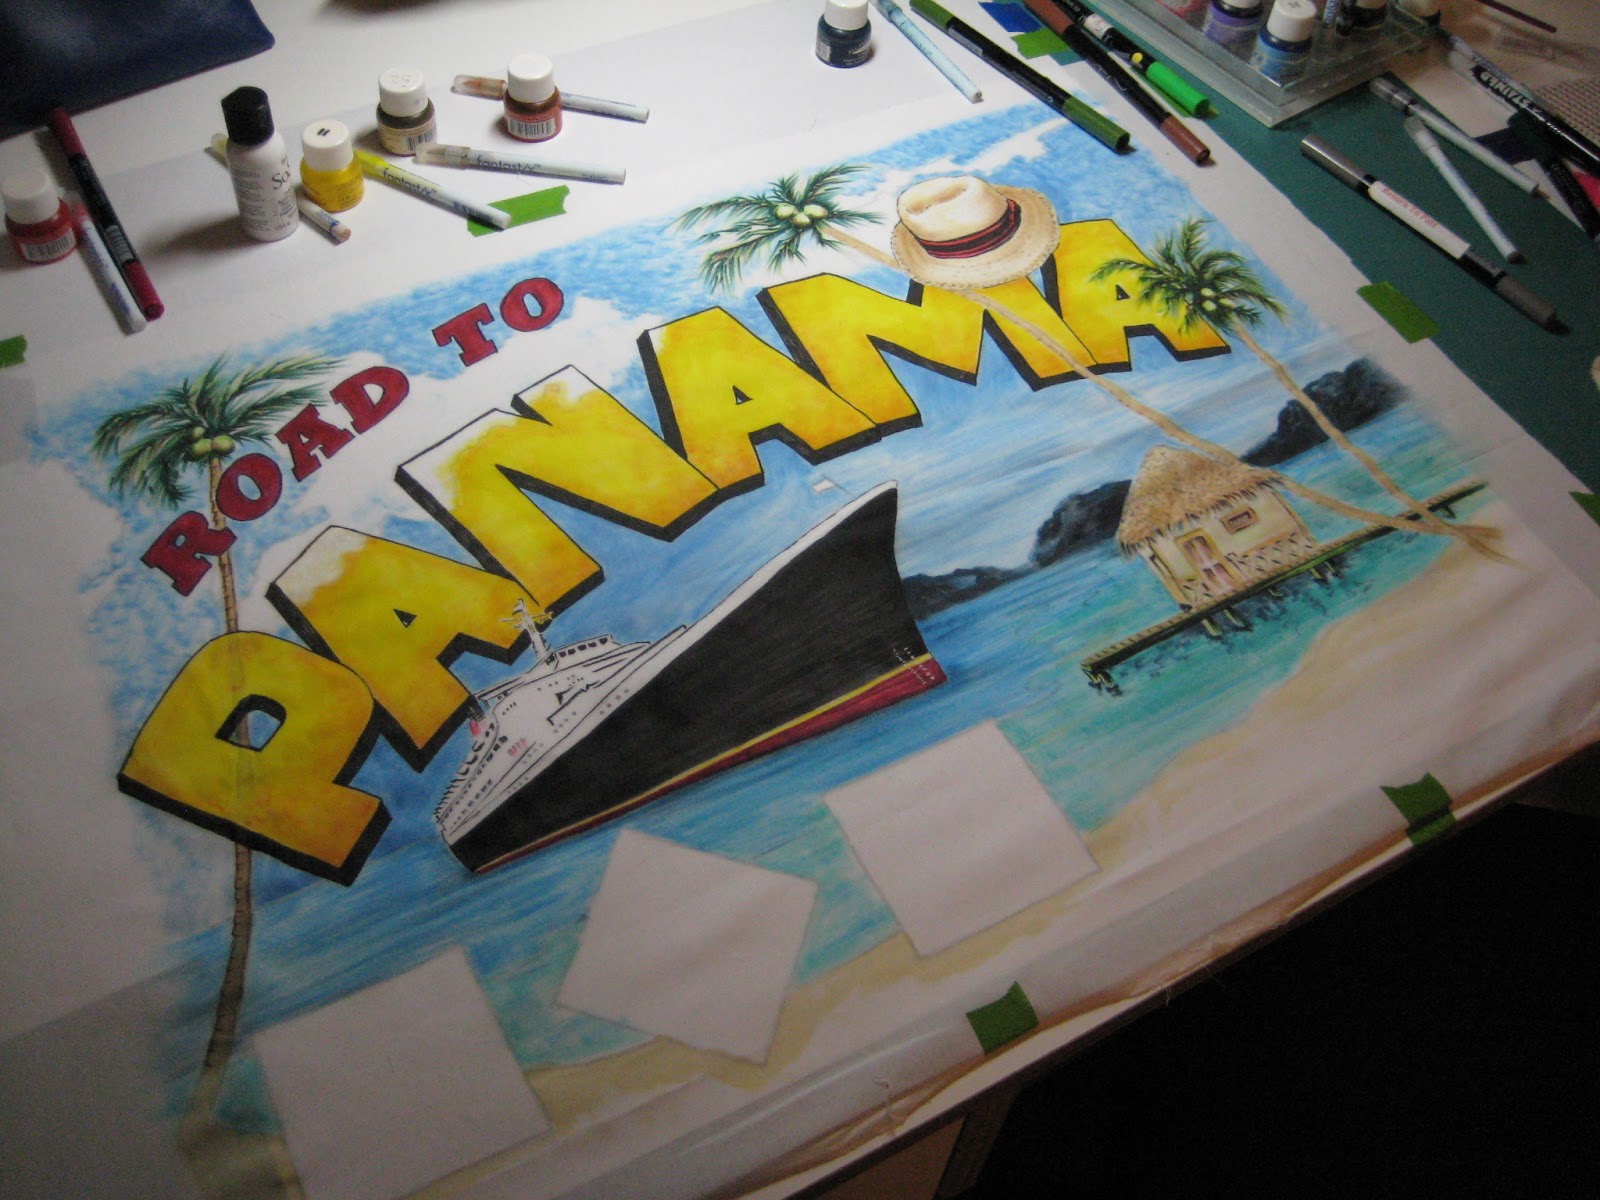
Palms, Shack, and a Ship
The addition of palm frons were done using a brush tip of a couple different green markers ( a medium and dark value) and a dark brown. Once the palm inks are dry... the surrounded 'specs' of white can be filled in with yellow and blue accordingly.
I've added some islands at the horizon line, an island beach shack near the foreground (the pic is crooked.. not the painting.. duh). You may also notice that the edges of block letters have been warmed using a transparent rust colored application.
At last the cruise ship is coming in. I'll be working on the squares on shore next.
I've added some islands at the horizon line, an island beach shack near the foreground (the pic is crooked.. not the painting.. duh). You may also notice that the edges of block letters have been warmed using a transparent rust colored application.
At last the cruise ship is coming in. I'll be working on the squares on shore next.
Monday, November 26, 2012
Starting The Cruise
I'm happy to be back in my studio and painting.... so here goes with the Road To Panama Cruise class project. After placing my PFD fabric atop the black and white enlarged drawing, I blocked in yellow ink into the Panama letters.... I have left some areas unpainted as white areas within the yellow letters will become an extension of fluffy white clouds that will appear in a blue sky. The black shadows around letters were added with markers once the yellow was dry or I would have had black blooms into wet yellow areas.
Next I used a dry brush approach to add sky blue background, then some palm frons and coconuts, and the PANAMA hat atop the"M". I know I'll need one more smaller palm tree for design balance. I'm already NOT fond of the palm crossing over the top of the P. I definitely should have followed my instinct to position it behind the P. I'll correct that later when all is dry.
Sunday, November 25, 2012
Home From Turkey Travels
Hello all... I surely hope you had a great Thanksgiving. I was fortunate enough to travel to Denver area to cook and enjoy the holiday with my daughter Allyson, granddaughter Kaley and 5 year old grandson Max. A good bit of fun and family time albeit brief. The day after BIRD day.. we spent exploring the wonderful Denver Zoo. I was impressed and all had a great time. Daughter Allyson and Grand daughter Kaley stopped for a moment below exquisite silk lanterns. Gorgeous!
Lucky for my pocketbook.. I didn't see these for sale anywhere! Now to unpack!!!
Subscribe to:
Posts (Atom)