First... it's good to draw a few on paper... but honestly... it's easier on fabric so if you have some spare fabric ( who doesn't?) , draw with a marker ( I used a regular size brown sharpie) til I got one I liked... then I stitched it following my marked lines. Then I got a bit cocky and added some circles in the spine and flourish w/i the feathers. When/if you do this, your feather puppy becomes part of YOUR personal reference library... Save it!
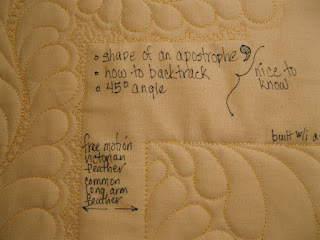
Now I'm stitching a permanent library sampler of several feather uses/versions. The Victorian Feather below is likely my personal favorite so far. It has a refined/finished feel to me. When you create your own sampler, remember this is your library... feel free to write yourself notes on it.
Here's some basic notes to self about feathers:
1)It helps me to think of individual plumes as an apostrophe-like shape.
2)You'd best know how to backtrack successfully if you are doing a variety of feather types ( Definitely a need to know on the Victorian style I'm showing). In order to stack your back tracked stitches exactly on top of preceding stitches, may need to go a bit slow.
3) Individual plumes look best when they meet the central spine at a 45 degree angle
and below... the route taken on creating victorian feathers.
This is a 1) BUMP to the right, BUMP on backtrack to the left (number 1)
2) BACK... is a feather drawn from the backtrack point to the LEFT and back to the spine (number 2)
3) OVER... moves you up and off the spine to start a new "bumped feather plume.(number 3)
Other plume options.. Swooping feathers might look great on a flying guess block.
or maybe to fill an open block. Before quilting, erasable lines... (now erased) had been marked corner to corner creating 4 triangles within which to free motion quilt. This would be hard to do without having those temporary intersecting lines as a triangled perimeter guide
a feather pattern might go in a sashing or maybe at the binding seam. ( the dark seen at the left edge is an erasable frixion marker.. later removed with heat) A couple visual options follow...
I think I like the version above more.
So then... take almost any area shape and there is certainly a feather option to be made.
For fun, I defined an area thusly...I first took a circular bowl to make a near half circle erasable line... then used a squared ruler to center on the curved line and draw another erasable right angle as the lower half of the shape. Feather away! I could see this idea done on a half or maybe a quartiled whole circle too.
I need more feather miles on the machine to improve my individual feather shapes but I think I'm out of the D grade.. maybe a C or better at times. I'll save this sampler always... It will help me get started on a real thing later. Hope to see some of you in my Filling Station Class next Friday ( Halloween time).
By the way... I love this warm yellow thread... Its "Sunshine" Highlites #713 40 wt. by Superior. I might need pick up another spool at Houston.


No comments:
Post a Comment