Wednesday, February 29, 2012

Testing Polycolor Pencils on Fabric

In helping a student find a required oil-based pencil for a colored pencil on paper class, I came across this product which met her needs, and ofcourse, since it was new to me, I felt I must test it out on fabric.
I first drew 2 pinwheels using the same colors out of this sample set(ofcourse there are bigger sets). I colored both the same and heat set the one on the right for a later test using a dry cotton setting on my iron. (The directions on the pencil box do not call for heat setting but because this is going on fabric, I thought I'd test it out) LEARNING: In setting the color with heat, I first used a pressing sheet to protect both fabric and iron. I was surprised that NO pencil transferred to the pressing sheet and I was also able to press the fabric without a pressing sheet where I saw no transfer to the iron surface either. YEAH!
The company also makes a pencil called a "Splender" ( a blender pencil) and because controlled blending on fabric can be challenging, I thought I'd play with that too. Two colors applied / overlapped, then 'splender' blending pencil applied.
I "think" it blended a little bit better with the "splender" than it did without... tho it's not a panacea for me.

Finally, I wet the entire test cloth to see how both the heat set and non heat set color held.
WOW... I saw no bleeding in either version... Good news. Not sure why but believe the hardness of the pencil perhaps combined with the oil base, helped. We never really care WHY... just that it doesn't bleed. A worthy test. I like these pencils though admit I still like Prismacolor pencils on fabric too. Both can be acquired through www.dickblick.com. Have a great day quilter friends!

Tuesday, February 28, 2012

Home From Havre, Montanas Hi-Line

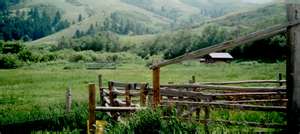
This is one fun and feisty group of great Montana women. The beauty of this state is underestimated. I'll show some later, BUT... the reason for this trip was special, AND unprecedented. Two full days of painting with not one single duplication of image. These are independent brave women taking on challenge even if never painting before! BRAVO!
We even had some out of state guests. I was on the move both days keeping up with this group, but stopped just long enough for a couple pics. (Sorry all... I wish I'd captured more)
Brenda(L) captured her neighbors steer, and tall Susan(R) bent over and laughing is on the way to completing an exciting graphic image I'd love to have myself.
Kemi worked from a challenging photo to successfully create an almost completed painting of her sons horse.
and Mary purposely spent her time practicing different portrait images. From Marys smile, I think she is happy with what she learned from these two plus other not shown practice pieces.
and..lastly Edna used a piece of sky dye fabric over which to represent silo and windmill images from what I believe is her farm.
I am eternally grateful to program organizer Laurie Sagerser,and hubby David for bringing me to and showing me Montana. So gracious. I missed meeting Lennie tho... dang! THANK YOU!!!!!

and... I must thank hosts Suzanne and Steve Huston for giving me great food and shelter and introducing me to their canine family of Zoey (I love that boxer sweetheart)
and energetic boxer/great dane mix "Titan" (asleep on the right)...ON MY FOOT so they could keep track of me.
I forgot to mention... I was also introduced to "Death By Chocolate Martinis" (YUM), and Hot Cider with a Fireball shot(cinnamon whiskey)... one with dinner on respective post class evenings out.. Two might have been nice but crawling home in the Montana cold would probably not! ;-0

Sunday, February 26, 2012

Painting in The Big Sky!!!!

I am now in HAVRE Montana for a 2 day Painted Quilt Art Retreat with Hi Line Quilt Guild. Wow.. this is almost in Canada.
I suspect the places shown in these pics are now covered with snow but my oh my... they don't call it BIG SKY MONTANA for nothing. This is my second trip to this beautiful albeit chilly state.

Saturday, February 25, 2012

DONE!!!!

Several more stacked heart areas done... a couple of which are shown here.
I loved every thread I used on this but perhaps my favorite was this variegated RAINBOWS by Superior. I loved the every inch color change.
It's always a good feeling to finish a quilting effort.... This quilt will now return to the owner Janmarie Halliday for binding. This was absolutely a pleasure to work on and use so many of those multicolor threads that I wasn't sure when I'd ever use. They were perfect for Janmarie's quilt..

Friday, February 24, 2012

Other than Gloves

I'm working in fairly small, tight areas on this border, so I am using a money sorting product for finger tack... no gloves needed. I like that much better though I will use lighter weight gloves sometimes. I've been using this product (found at stationary stores) for many years before the quilter industry came up with their own product to do the same thing. This type product is cost efficient and easily found at a Staples or Office Max. I asked the bank teller the other day if its a problem to leave it open all day. It might be different in other areas of the world/ country... I don't know, but bank tellers in California seem to be able to do it. I may give up my habit of opening/closing every time I want to use it during a quilting session.

Thursday, February 23, 2012

Playing With Hearts

The black pinwheels in this quilt have small colorful hearts scattered throughout the black fabric. I thought it might be fun to sprinkle hearts in areas of the border using different color threads area by area. It is amazing how bold a 40 wt thread looks on black while the same thread can look very thin/hardly noticeable on the black and white small scale print used in the inner border area by the quilt top maker.
Now to move about the outer border and vary thread colors for this same stacked heart fill pattern.

Wednesday, February 22, 2012

Checking Out The Frixion Pilot Gel Pen

Just because something has been out on the market for a while, and I've heard a couple people say nice things about it, I'm not comfortable using it on someone elses quilt til I've made a test on it's stated erasability. ( I'll cut to the chase and say it works.) I am looking to draw/quilt straight lines that run from light fabric to dark. My Sewline white chalk pencil works great on dark... I plan to use the Frixion Erasable Gel Pin on the light.
Now the test... Using a Frixion pen, I drew 4 parallel straight lines on light fabric.
I then quilted rows 1 - 3 and stopped mid way on the fourth line (blue) and backed off. When I ironed over the drawn line (on cotton setting)... "Voila".... the drawn gel pen line is gone. I'm lovin it!

Tuesday, February 21, 2012

The Spin I'm In... part 1

I offered to quilt this piece for a dear friend. You probably all have seen this pattern of interlocking pinwheels.

So many that make this pattern make a smaller wall hanging. My friend made a good sized piece so there are so many pinwheels, I don't want to know how many there are. Before beginning visible stitching, I outline stitched in the ditch around each black pinwheel. I want to create a quilting pattern that doesn't require marking. (As an art quilter, I seldom do that anyway). So I broke the pinwheel down to 4 same elements and treated each triangular(ish) element the same.

ONE. Using the outside seams as the initial visual point of reference for needle drawing, I began at the center of the pinwheel and free motion straight line stitched toward the outer end of the pinwheel, then turned the corner stitching toward the opposite side edge. (NOTE: Kindly ignore the in-progress batting fuzz seen in close-up views. I will be cleaning this up at the end.)
TWO. Another right angle turn and stitched downward toward the center stopping about 3/4 inch from the pinwheel center seam .
THREE. The next step is to stitch again toward the outer end paralleling the first stitch line and also stopping short from the end of pinwheel stitched line again by about 3/4 inch.
FOUR. Now turn again with a short curved hook stitch pattern.
FIVE. And finally head back to the pinwheel center seam of origin with right angle stitch lines pretty much going right through the middle pf the channel created by previous stitch lines.
SIX. Back to the seam of origin where a short distance stitch in the ditch will get you to the next pinwheel element.

Friday, February 17, 2012

Another facing technique.... I adore the work of Melody Johnson and own a couple of her fused quilts and painted canvas pieces. She is creative in ways of finishing quilts....
click here to go to Melody's tutorial on her way of facing an already quilted piece.
http://fibermania.blogspot.com/2012/02/facing-quilt.html

Thursday, February 16, 2012

Where HAVE I been?

No teaching moments for blog readers on this effort. I've been in my long arm room ( aka garage) for several days working on bartered quilting this piece for friend Mary Lou Ripper. Some while back, Mary Lou "gave" me a wool bed rug for my mountain home bed in exchange for quilting one of her quilts.
So on the frame it went Monday.
I used Pam Clarke's quilting within the lines marking method for the plain blocks.
...then simple ditch outlining on the floral blocks.
I enjoyed a free motion unplanned leaves and circles around the rick-rack vine border.
finally, it's done and on it's way to Mary Lou tomorrow.

Monday, February 13, 2012

One last KUDO to a Road Quilt

I know this has happened to you too.... You've gone to a show, have become awestruck by a quilt that had no ribbon on it. This was exactly the case for me at Road this year.... "The Archer" created by friend Wendy Knight from San Diego is her original design and pieced. BEAUTIFUL. Only after I stood in front and drooled over it did I realize this was Wendy's work. Fantastic. I enjoy the in and out of focus of the elements of this piece. The mystery of just that draws me in.
The story of this piece is a good one.
From my arms distance perspective, this piece is strong artistically and technically. WOW! Look at the smooth cursive done here in the background. I'm impressed.

I lied.... a second KUDO lest I forget .... If you attend Road each year you hopefully notice how effectively quilts of similar interest are grouped for display. THIS IS NOT AN ACCIDENT but is the creative planning and inspiration of Phyllis Morrow of Orange County, Ca. If you are putting on a big event,quilt show or otherwise, Phyllis would be a treasure on your event staff.

Saturday, February 11, 2012

THANK YOUs to students

I can't express how much fun the Road To California shows Painted Quilt Art class was. Such great people...
One of the things I like about this class is that almost everyone is doing a unique project. THAT keeps me on my toes for sure. I always say.. the teacher is the one who learns the most in classes.
We end the 2nd day with a "WALL OF FAME" exploring with our new supportive art family of sorts, what we learned, how we might move forward with finishing. Notice the photo of 2 kids and the painting of same directly above. Great job!! Our WALL of Fame was actually multiple walls as we went around the sides of the room. I apologize for not having all work shown here. My brain is not on blogging in the middle of class. Argh!!!
This is a piece (by Elodie of Sherman Oaks) I can't wait to see finished. The original photo was her own from a trip including a visit to this Greek Restaurant (original photo at bottom) . The colors of the original are fresh and the scene inviting, and Elodie is absolutely on the right track toward a gorgeous result.
Wish I'd had time for more photos... Rats.... I'm looking foraward to receiving finished project pics from students.

Wednesday, February 8, 2012

Marilyn Badgers Super Star

This woman is a phenom on the long arm or otherwise.
This quilt is truly a "super star".... here's a couple closeups of her work on this quilt which took top honors at Road To California.
and
If you ever get a chance to study with Marilyn... do it. She's great!!!

Monday, February 6, 2012

Gotta Love David Taylor's work!!!

I've never seen any applique quilter "paint' using needle turn so beautifully as does David Taylor. Many have heard him say he started saving small 'scraps' of fabric as a kid. He found them fascinating and years later had boxes of small scraps. When he began a quilting career, he was most comfortable working with such small pieces that he literally can almost paint pictures with his varied/small fabric choices. I love this curious feline!

Sunday, February 5, 2012

All Noble Seasons Quilts on Parade TOGETHER

Mark your calendars!
The entire collection of Noble Seasons - All Artists, All 4 Seasons on exhibit for the 1st time at:
The Quilt Fest of New Jersey VIII
March 1 thru 4 2012
Somerset, New Jersey
Click Here for Quiltfest's web site.
I have 4 pieces in this exhibit...
Spring 2009 "Spring Break"

Summer 2010 "Seasonal Changes" ( My hubby then and now )Notice much difference???
Maybe not as funny as it seemed when I painted it! BUT TRUE!
SUMMER OF '42
and then LAST SUMMER


Fall 2011 "Outside My Window" (in Mt. Baldy Ca. mountains)


Winter 2012 "Winter's Veil" ( The long cold winter )