Saturday, October 31, 2015

Fusing with Melody

Anyone who has ever met Melody Johnson knows she's talented... and  she is another woman marching to her own drum. I love that.  This small piece below hangs at my studio. Some years back, I had recently seen it on the cover of Quilting Arts when my guild had Melody as a guest speaker. (Of course I had booked her as I had long appreciated her work)  She showed up with a few 'for sale' quilts. When I saw this was among them, I was shocked to be able to get it .  This is a very different palette than Melody's  norm at the time.  Its odd and enjoyable shape is hung using Command strips... kind of post it noted to the wall. Wonderful invention.
 On the opposite wall of my studio is this Melody quilt.... full of energy and fun!  Melody is still creating like crazy... just may be different stuff than we used to see.
 Speaking of marching to their own drum....an  art quilter I DON'T own but would've owned this one if I could is Laura Waslowski (of Artfabrik), a good buddy of Melody and another member of "The Chicago School of Fusing. "  This was a pretty large for sale piece that someone beat me to the punch!  I love her sense of humor!
Another reason I salute Laura is that I remember her talking about the tomb of the unknown sew... er! She said she saw these tombs all over the country!  When I bought my studio in 2007, I thought of Laura as I found the concrete slab had 2 tombs only inches apart.

I figured they must have been very small sew... ers. ;-( 


Friday, October 30, 2015

Libby Woman... who knows all about THREAD

Whether this is true or not.... it fits... Someone said long ago Libby touts the existence of fabric as needed for the purpose of hanging thread on it.  And boy, has she done just that.
Here's her piece I own ( Drift III) which displays so many tricks on the color/ type, stitch line of thread to make a quilt SING her praises.  I was lucky to purchase this from Libby ages ago at Art Quilt Tahoe. I was such a green naive art quilter in waiting then. Drift III  is more than a beautiful image... it is a 'class' of worthy information/ learning gathered from studying the piece at length.  Love you Libby.. Thank you for all I've learned from studying your work!
 I feel obliged to mention, Libby's threadwork on this piece is so refined, you will not find a single glitch anywhere in her work. 

Thursday, October 29, 2015

Honoring Ruth McDowell's "Thalia "

 This intelligent, witty woman marches to her own talented drum.  KUDOS! . This was the first artists quilt I purchased after seeing her lecture ages ago at Road To California. I was a new/ quite naive entrant into the quilt world and somehow found the courage to contact Ruth, asked the price and proceeded to purchase Thalia.   These WHITE flowers had over 20 different white/near white fabrics in them. The interesting blue fabric behind them (Ruth said) is a tablecloth found at an artsy emporium  She doesn't seem to concern herself with what a quilt judge might think.Someone told me she never submitted her quilts for judging. I don't know if that's fact but I admire the thought of her dedication/confidence in her methods.  Ruth has retired from  the national teaching circuit, but I am confident her / dry intelligent sense of humor flourishes still.  She is about to be showcased in an upcoming exhibition of Quilts in the northeast... I 'think' it will be labeled Quilts of Vermont.  Apologies if I have that title in error.  It's in the planning stages.  Click on photo for enlarged view.

Tuesday, October 27, 2015

To the Talent of Hollis

As you read this , I am in Houston, teaching classes all week. This seemed a good time to honor some quilts and quilt artists I have long admired.  I'm starting with Hollis Chatelain... a talented and well educated artist adept at both her own work and helping(teaching) others to find their path.  I took classes from her long ago when  I was still in the corporate world and trying to figure out how to use my watercolor background on fabric.  Hollis works hard to help students to stretch and learn... and indeed I stretched and learned a wealth of information from time with her.  I'm drawn to different medium and subjects  but admit my work is affected by her teachings. Here...3 quilts I own of hers... My treasure and perhaps her greatest work exclusively in thread is" Burkinabe Mother"  coming from a photograph Hollis took in Burkina Faso.
 This piece is an ALL thread portrait  ( no dye/no paint.. all thread) done on the backside of a piece of 'seconds' cloth from a mill in Africa. Hollis cleverly incorporated the bled through areas into her piece.  Click on photo for an enlarged view. The peaceful look on this mothers face is profound as she simultaneously works and mothers her child.  I so loved this piece, I also purchased framed fine art print no. 1 of this image. I've kept the original away from light and dusty air. It's pristine. Contact me if interested in either of these pieces.  Hollis has 2  new pieces in this years International Festival.  Look for them should you attend..I think you'll see ribbons on both!
I used to tell Hollis she was the 'Madonna' ( as in the performing artitst) of Quilting... routinely exploring new approaches to her art form. While I see her continuing to stretch,  she does likewise hold on to that close to her heart.. her message of equality. 

This piece below explores thread work atop a hand dyed piece.  It is called "Beyond" and educates the viewer on the effects of thread value, color and line. For me, as I see it, I am standing in  darkness looking up through dark clouds in a night sky and into the moonlight beyond. You might see it differently but it's beautiful whatever the case.  This was my most recent purchase ( perhaps my last) as I have abandoned the corporate world for the one of artistic expression... less money... more joy! ;-D 
Click on any photo for enlarged view. 
Now, my final piece is the FIRST piece I bought. It is called "Color Cocktail" and hangs in my studio.  The energy created with contrasting compliments fuel my own creative energy.  I purchased this piece a mere 2 weeks after 9/11... at an independent study week Hollis organized near her home. I looked at it for days and finally could not stand it, asked it's price, and bought it. It was at this retreat, she was informed she'd won a major International Festival award for the infamous Blue Men piece.  That major award turned out later to be the Best of Show. This piece is fairly large covering most of a wall and one created directly AFTER Blue Men which most would recall mostly monochromatic blue.  Hollis said she NEEDED to work in color following that long period of mostly one color. Lucky for me!  

Saturday, October 24, 2015

Long Time Coming

This isn't much of a photo for learning ... but this has been on my longarm since June.  Finally today... I got it quilted as a new sports bedspread for grandson Max.  He's quite an athlete. I need to get it bound now and 'am leaving town  for Houston so guess it will be November  before it's complete and shipped off to MAX!!!   BUT.. today brought serious progress and gratification.

Friday, October 23, 2015

Feather Sampler

I'm heading to Houston next week and one of my classes is called The Filling Station.... a class on filler stitches. I'm pretty good at those as I use many of them regularly.. BUT ... It occurs to me that someone is likely to ask about feathers... oddly something I have not done on the dozens of quilts I've made... but considering most of my work is pictorial art pieces... it's maybe better understood.  I figured I best try to master this feather thing.. I'd made ONE on a sampler of fill stitches... I objectively had to give it a D- grade. All quilting mastery is about miles on the machine.. so I covered a half mile today. ;-D .. playing.
First... it's good to draw a few on paper... but honestly... it's easier on fabric so if you have some spare fabric ( who doesn't?) , draw with a marker ( I used a  regular size brown sharpie) til I got one I liked... then I stitched it following my marked lines. Then  I got a bit cocky and added some circles in the spine and flourish w/i the feathers.   When/if you do this, your feather puppy becomes part of YOUR personal reference library...  Save it!
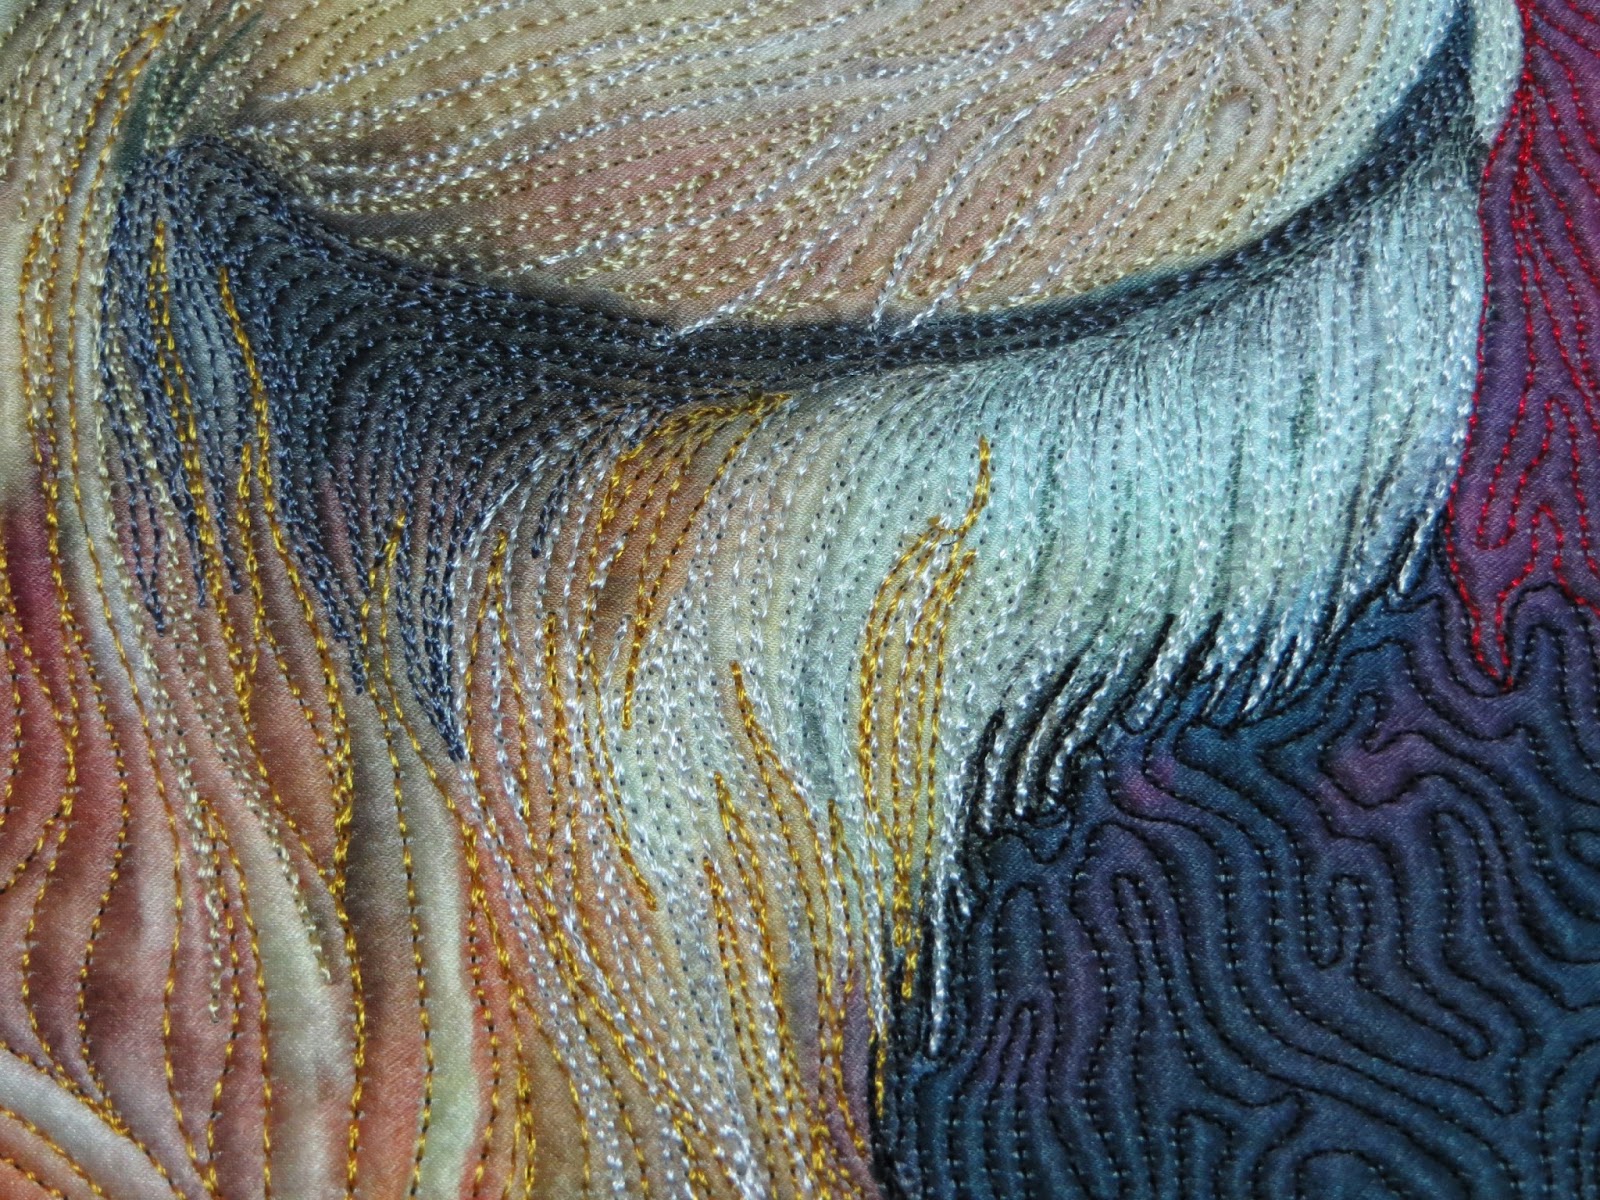
Now I'm stitching a permanent library sampler of several feather uses/versions.  The Victorian Feather below is likely my personal favorite so far.  It has a refined/finished feel to me.   When you create your own sampler, remember this is your library... feel free to write yourself notes on it. 
 Here's some basic notes to self about feathers:
1)It helps me to think of individual plumes as an apostrophe-like shape. 
2)You'd best know how to backtrack successfully if you are doing a variety of feather types ( Definitely  a need to know on the Victorian style I'm showing). In order to stack your back tracked stitches exactly on top of preceding stitches, may need to go a bit slow.
3) Individual plumes look best when they meet the central spine at a 45 degree angle

and below... the route taken on creating victorian feathers.
This is a 1) BUMP to the right,  BUMP on backtrack to the left (number 1)
2) BACK... is a feather drawn from the backtrack point to the LEFT and back to the spine (number 2)
3) OVER... moves you up and off the spine to start a new "bumped feather plume.(number 3)
 Other plume options.. Swooping feathers might look great on a flying guess block.
or maybe to fill an open block.   Before quilting, erasable lines... (now erased)  had been marked corner to corner creating 4 triangles within which to free motion quilt.  This would be hard to do without having those temporary intersecting lines as a  triangled perimeter guide

 a feather pattern might go in a sashing or maybe at the binding seam. ( the dark seen at the left edge is an erasable frixion marker.. later removed with heat)  A couple visual options follow... 
I think I like the version above more.
So then... take almost any area shape and there is certainly a feather option to be made. 
 For fun, I defined an area thusly...I first took a circular bowl to make a  near half circle erasable line...  then used a squared ruler to center on the curved line and draw another erasable right angle as the lower half of the shape.  Feather away!  I could see this idea done on a half or maybe a quartiled whole circle too. 
I need more feather miles on the machine to improve my individual feather shapes but I think I'm out of the D grade.. maybe a C or better at times.   I'll save this sampler always... It will help me get started on a real thing later.  Hope to see some of you in my Filling Station Class next Friday ( Halloween time). 

By the way... I love this warm yellow thread... Its "Sunshine"  Highlites #713 40 wt.  by Superior.  I might need pick up another spool at Houston. 

Thursday, October 22, 2015

Bound, Sleeved,Labeled and Done

The final finish seems slow coming... (as it's 90% hand work I guess).The Red Lion in Silk is DONE. A friend asked me yesterday a.m... "Do you feel a lot of satisfaction when you've completed a piece?"
 My reply... "I'm good for about 30 seconds of joy!" followed by the kicking in of that mindset coming from 30+ years managing a complex  24 hour operations organization. "Great, that's done... what's the next most important thing?"  The good news...  I'm never bored! ;-D

I will be leaving to teach in Houston on Monday the 26th ( teaching Tuesday thru Saturday)... I think this guy will join me for show in my classrooms, Machine Quilting Forum on Thursday next, and my Friday skill building quilting class..." The Filling Station." This  18" x 18" piece will be available for sale... inquire if interested. Click on photos for enlarged view.


Matching 1/2 inch give sleeve attached... yeah! That final hand stitch on the label is always satisfying!
 While I shipped  most of my needed supplies to Houston a while back, I admittedly have some  more prep and packing to accomplish. I generally prefer to transport my quilts with me!

I have nothing in the show this year.  Why not?  It would have been a conflict of interest so nothing even submitted for jury. I should be submitting for the 2016 year.
This year at Houston, I get to present a judges choice award as I was honored to have been a judge for this years festival. I'm excited! I love the chosen quilt and so hope the maker is present. I have happy questions!

Tuesday, October 20, 2015

Border, Sign, and Block The Red LIon

With all that curvy curvy mane stuff going on the the center area... I needed to use something more visually stabilizing  on the quilt BORDER  Since the fillet in red is a 1/4 inch... I decided to use a quarter inch echoed squares  motif around the whole border (top,bottom,left,right sides). It's not absolutely necessary to use a quilting foot to do this.... Instead, I put my regular 1/4" pressure foot on,  significantly lightened up the pressure foot tension, engaged the feed dogs, and tested straight stitch on my practice quilt sandwich ( I always  use one on something important.. same batting top,bottom fabrics too... i.e. a real comparison). This straight stitch squares quilting wasn't hard to do and as you will hopefully think ... looks nice.
SIGNING  is one of my favorite things.... not because it's my name... but it means I am done quilting and can move to the finishing steps. Quilts of all types are art and I think are justified carrying the name of the maker.  I normally am using chalk or equivalent marking top and bottom parallel lines to guide my name quilting but in this case, I chose to sign my name on the border fabric already equipped with 1/4" parallel lines of stitching.  In writing/signing...go slow. I use an average weight thread ( eg. 40wt).  If the signature is not as prominent as you want... once you've written your name forward, you can slowly backtrack to the start of the first letter.  I didn't do that here...   not desired/needed.  I do like my signature on my quilts but I don't like it to distract from the central image.
Now to BLOCK. I have placed this quilt on my big board... evenly dampened the border fabric which has a bit of service distortion from all the pushing and pulling of the central image quilting process.  I pressed the outer border areas with an iron, to get them flat but not yet dry. The outer edges of this image is where I have pinned through the quilt and into the big board.. holding the shape into place while I let it air dry overnight
Binding and sleeve are now needed...

BTW... About blocking... it can and may be done more than once.  Once a piece has been folded / traveled etc to a show and returns home, it can be a bit out of wack and could be reblocked.

Sunday, October 18, 2015

The 'Mane' Event

Now to get this face and mane in place.  To add interest and a place for the eye to rest a bit, I am leaving selected areas UNquilted.
When time to tackle that bad hair day mane, I choose to begin with quilting the dark shadows first. This is so I can later stitch golden or white thread over some shadow areas.
Next the addition of gold threads which I have by design  NOT consistently stayed in golden paint areas. ;-)  It's a bad hair day after all.

Last was white areas that are mostly concentrated around the face. Here's another area I tried to leave some unquilted areas  to 1) add interest/ eye rest areas, and 2)  further show off the surface /sheen of silk.
I return to the chin area and add charcoal shadows
and finally just below the chin is the lions shoulder. Some darker red/brown thread emerges from the shadows.
Happy with the 'parts' now quilted. The borders, sleeve, and binding remains.   .. Gotta get that done.. next post ;-D

Saturday, October 17, 2015

Quilting Beautiful SILK!

Good heavens silk beautifully reflects light.  This is a small piece ( appx 12" x 12" of silk...)  Before I began this first real quilting, I used a .004 monofilament to secure major areas in a somewhat stitch in the ditch approach... ( eg outline of lions face.. etc.  ) That allows me on this SMALL piece to start in the corner background area.   Were this a larger quilt top... I would follow my norm of working from the center out or I would likely have the dreaded surface distortion.  The original painted background (this is a giclee of my original oil painting)  was a mixture of darker and lighter reds.  I'm using a darker red thread in the areas of the darker paint. The quilting motif is a generally meandered topography style.

Then to lighter red thread to fill in remaining areas. There is a good bit of echoing technique here.  
I think I like this background. It will nicely  counter the quilting that will come on his face and main. 

I get to his face and mane next up. 

Friday, October 16, 2015

Basting a Silk Quilt Top

Pinning is absolutely out with this fine silk... the pin holes would look enormous and not easily covered with stitching. I'm not confident on using  spray glue on  light silk ( haven't tried it but it seems wrong. ) I am instead using a fine fusible web ( Misty Fuse) which I used also on the Winged Lion where it worked well.  It is a fine webbing of glue which with heat will adhere to both surfaces it sits between.  I suppose one could use a full sheet of misty fuse equal in size to the top but honestly... snippets of  webbed glue work fine.  I've cut a couple stacks of small squares  with the lower square  on the right of the picture (very sheer) being a single piece of web. Now we'll move to the back side and get started.
On this process, I work from the middle of the piece and away from it a bit at a time.  For understanding of the photos, I am using black batting ( dream poly) for this project... and a red/orange batik backing seen at outer edges. To get started, you can see I've laid out an almost checkerboard pattern on a few inches of the batting.
I'll then carefully place the top in place over the fusible web, then press according to instructions in the package. 
To be safe and protect the delicate silk, I use a pressing sheet atop the central silk image.
I then return to the front, a) roll back the top to expose non fused area, and b) repeat the fusing process as previously shown. c) Once the lower half is completely fused, I turned my piece around and fuse from the middle to the top. d) You might do otherwise but I followed the same process to fuse the backing to the batting. This is a wee bit time consuming but really worth it.
Now, the  sandwich is fused front and back . As part of my  normal quilt prep. process I fold and pin to the front the outer edges of the backing  area that isn't fused.  It only took one failure in the past when not securing the loose edges of a backing to find it's quick insurance to do so to make absolutely certain nothing somehow folds backward into future quilted areas.     ;-D

I'm planning for quilting to begin in next post.

Thursday, October 15, 2015

Creating a Dramatic Border

I decided it would be fun to place a border on this dramatic piece.  There is not likely a more dramatic color combination than red and black... so thats where I'm headed.   It is my intent to place a 1/4" fillet of red textured cotton between strips of black on black batik.
1) The simple part first: Using  a 1/4" pressure foot, I added black on black strips of 1 1/2" width around the silk.
2) I then cut small strips of red fabric for the  1/4" fillet.  This will hopefully make sense later, but I actually cut 1 1/4"  width of red fabric strips and added them to the previous round of black


3) Now I cut 4" black on black batik strips I will shortly add all around using a different than 1) and 2) seam process.  Even now, I don't think I will want 4" width at the outside edge, but I always cut a width at least 1" wider than I 'think' I want when all is said and done. I like having 'options' for later.

4) The trickier  1/4" fillet part comes now but don't sweat... it's easy if you use your pressure foot and previous seam lines to guide your stitching.   This step is a seems a bit backwards cause we are working from the backside. This will be done 1 side at a time... I did both sides... before doing top and bottom. First the prep.  You will  " PIN from the FRONT ...  SEW from the BACK"  as shown below. 

a)  PIN from the FRONT process: The 4" black strip  is pinned  face down above the face up top... .. working right sides together, the right edge of the red fabric lines up the edge of the  4" black strip.   This should be pinned in place along the edge. This is done with right sides together though I am using a black batik here so it looks the same both sides.   Note.. for easier reader understanding, I have offset the black about a 1/4" from the red but honestly, I generally do line the edges up together. 

b) Mark before Sewing!  Since you will be using the left edge of you pressure foot to line up with the previously stitched seam,  you will want to use a marking pencil to draw lines where needed to reflect an extension on lines needed as stitching guides.

c)  SEW from the BACK process. Now using stitching across the width of the quilt , do so keeping the left side of the pressure foot lined up with penciled extensions at outer edges and the previous stitch line in the central body of the quilt. .

d) Press this seam before moving to opposite side. Looks cool, yes?


e) Once  the two sides are done, repeat  4a) thru d) steps for top and bottom. You'll again need to pin then pencil mark your pressure foot guide line.
and stitch as before 
Now pressed, the fillet of red really stands out.  Trimming of edges yet to be done.
 What you see below is more extreme than I want, but I'm playing by turning borders under now/ trimming later...thinking I might use a slightly asymmetrical border.   Maybe an 1" off the top and left border would be interesting.
Next, the quilt sandwiching process will clearly differ from the norm of cotton quilts.