Monday, October 31, 2011

Mar 2012.. To the Caribbean...YEAH!

A Caribbean DEAL March 2012

World of Quilts Travel has contracted me to teach next March 18 - 28 on a 10 day cruise of the Caribbean. Beginning in Miami... cruising to 6 ports, 3 days at sea classes... all that for $999.00 I've created some new and interesting / fun classes for this trip.

click here to check out worldofquiltstravel.com


Miami -
Fun Day At Sea - -
Samana
Tortola
St. Maarten
Antigua
Barbados
St. Kitts
Fun Day At Sea - -
Fun Day At Sea - -
Miami -

Packing and Heading To Houston

I just went online to add another bag to my flight to Houston. No matter how we try.... we always need more space.... In this case... I wanted to take a few more of my quilts to show have at my lecture, quilting forums, and classes:
Thursday Nov 3rd morning 9a - noon Machine Quilting Forum
My part..translating non-quilting media into doable quilting design templates
Thursday Nov. 3rd afternoon 2-4p Mixed Media Miscellany
My part.. Drawing and Painting for people who don't draw or paint :-)
Friday Nov. 4th Lecture - 11am til Noon
A Painters Path To Quilting
Friday Nov. 4th evening - The Art of Quilting
Choosing Line and Color
Saturday Nov 5th Daytime Class - Santa's Secret
I can hardly wait to see what I forgot to bring!!!!
Ha! Not!
Hope to see some of you there...
I have an Honorable Mention Quilt ( My Kind Of Dragon) in the painted category. I was pleased and surprised at this recognition. The piece had a couple flaws I was NOT happy with.

Tuesday, October 25, 2011

One Last Thought

It's that old ball game saying... It's Never Over Til It's Over.... so even when you're finished... their may be a chance for add'l upgrades.
I wanted the blue and rust on the mailbox to have a little stronger value... so out come the Prismacolor pencils. They work well atop fabric and worked fine atop the matte medium as well.
A final reflection: I definitely think I'll be using this stencil on another project someday too.

Monday, October 24, 2011

Border and Quilt

Continuing on from previous post: I first chose to add a border because this piece is so small ( about 12 x 12" ... it asked for one!;-) I wanted to keep it in a light simple palette much like the background of the collaged piece. Because it still called to me for a bit more rust, I inset 1/2" channel of light rust in the border. I maybe could have gotten away with a slightly smaller width inset, but I like this overall.
After securing the border seams with monofilament top and bottom (I used a new Sharp needle size 70.), it's time to quilt. I chose a variegated brown/tan/black 40wt poly to outline the stenciled areas. One could almost get away with stopping quilting after this. I wanted a wee bit more.
For all stipple haters, I apologize.. I'm using a micro ( REALLY small) stipple to fill in between the quilted stencil areas. I used a light variegated 'sand' color.. again 40wt poly to knock down the background in order to show off some of the elements.
I like that little birdie...It was a stamp that I colored in with Tsukineko inks (my overall favorite working media).
I also did some other minor securing of elements with other colored threads, and now, I think we're about ready to move on to finishing... besides, I must now leave the studio to go pick up my 72 yr old hubby from his college overnight field trip to the desert. He likes hanging out with 'kids.'

Sunday, October 23, 2011

A Journey in Collage on Fabric

Here we go playing with a another class sample for next March's Caribbean cruise with worldofquiltstravel.com This will be a short class so I needed to plan a small project. We do have shore excursions to take ;-) Here I'm playing with collage on fabric of thin papers (napkins tissues, tea bag tissue) plus stamping, stenciling..... and eventually quilting. It reminds me of when as kids we played with all kinds of shapes of construction paper, and glue. Only here we are using fabric, tissue, and matte medium generally used in acrylic painting. The matte medium is our GLUE. Judy Coats Perez is a master at this. She's teaching a class at Houston on this process. Kudos to her!

This effort is free and fun... but I honestly got out every stamp, stencil, paper napkin plus a bunch of other stuff to create this little sample. I used about 1/20th of what I layed out for consideration. You don't need all that.... but we sometimes can't help ourselves just like buying fabric. I started by laying out a base fabric and tearing out tissue pieces I wanted to use (tearing tissue edges seems better than a clean cut... you'll see later) I auditioned some stamps too.

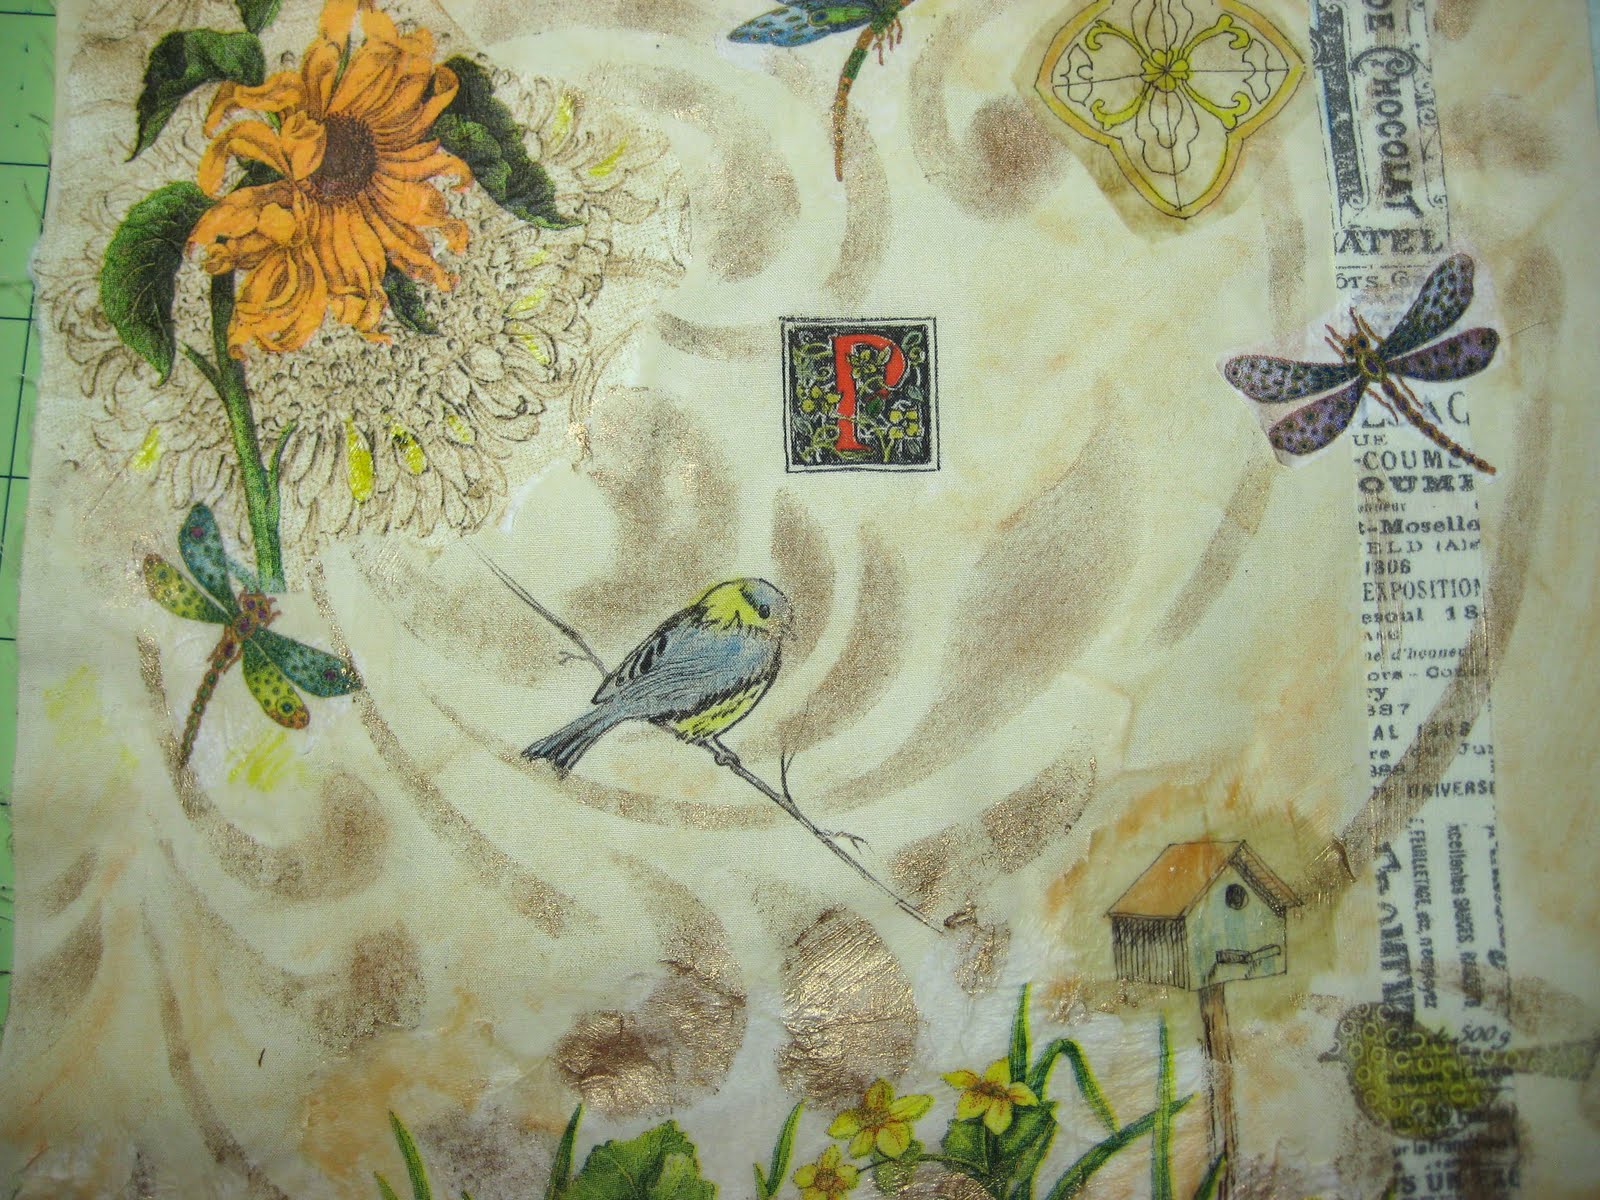
When I had a decent layout .... I left the stamps on the fabric ( sort of to save their space for stamping ) and began with a foam brush first applying a thin stroking of matte medium on an area I was preparing to 'glue' tissue. The tissue was then placed on top of the wet medium... then I carefully ( I mean really carefully) applied matte medium over the top of the tissues. A light hand is needed.... or the tissue will tear. Pigment Ink stamp pads were used to get the birdie image and an initial ( so vain of me)... a "P".
Once the stamping and matted tissue dried ( took a good while...hairdryers are wonderful things to speed the process!!) I knew I wanted to use a stencil to 'tie' everything together. I chose a stencil that had a happy, pretty feel .. very quilter like... and that would be my choice.

Out came those Shiva Paintsticks I bought years ago, a stencil brush, a piece of freezer paper I used as a palette and I was ready to do some stenciling right atop what I'd created on fabric. In some cases, when an important image appeared in a stencil opening, I stenciled around but not atop the important image... (like the birdie)

This quickly unifies elements. I like it.

One could now play and tweak color for some time. Every thing you do might prompt a change/enhancement elsewhere. I wanted to do some subtle color balancing. There was a rusty yellow/orange flower in the upper left... The piece called for some subtle use of rust elsewhere, so the birdhouse on the bottom right got the call.

I'll let this dry overnight before I consider anything else. Shivas need 24 hours cure time as they have oil in them.

Friday, October 21, 2011

Ya Just Never Know

Sometimes the thing you think you'll hate is the thing you end up loving. Since I and most quilters have many tote bags I wasn't excited about zentangleing a tote bag. But I decided to make myself an interesting food shopping tote that I might actually remember to take in the store.
I first took a white canvas tote and water sprayed it followed by misting green and yellow fabric paints. I used a plain damp foam brush to 'move the some of the splotched drops around'. This took a few hours to fully dry
I liked the base paint 'mess' over which I will zen later.
Once I started drawing , I couldn't stop myself....The black pen drawings were first... then I just HAD to use some markers and inks to add a bit more color.
Color addition is purposely subtle. I like the integrated look of soft values.

Pineapple anyone?

finally I enjoy the quilted apple.

Thursday, October 20, 2011

Well This Was Certainly Fun!

I'm "zenning" a ball cap here... thinking a cap might be nice to wear as Caribbean Cruisers walk about on shore excursions. Any white or light value fabric hat will work. In playing here, I picked up inexpensive Tulip Paint sprays, water sprayed my white cap... then following instructions misty sprayed a variety of colors on the hat. It's fabric paint and it will dry permanent... and I set it in the sun to dry. See http://www.worldofquiltstravel.com for cruise details

Then ZEN...
This was fast AND FUN! First a palm tree outline on the head area of the hat and I added some fill textures within each leaf. A none existent flower on the bill... then some curved sectioned zentangle and quilting texture patterns. Click on photo for closeups.
I may need to experiment with adding color on white ...AFTER.. the zen is done. I'm pretty sure watered pigment inks will work well... There's a number of media I think will blend with Zenning. Exciting!!!!!! I've decided you can't do anything wrong with Zentangle... It's all doodling with a minimal plan.

Wednesday, October 19, 2011

Zen..ing out to sea!

I'm starting to create samples for next March's Caribbean Quilters Cruise with World Of Quilts Travel.com It's already fun to think about it. YEAH!
I've created some half day classes with one is morning, another in afternoon so cruisers can learn more than one technique in one day. Since I'm soooo enjoying playing around with Zentangle on Fabric, I'm playing now with a class where cruisers may chose to Zentangle a white or light-valued ball cap, tennies, tote, or whatever they want.
The first I'm sampling is a more refined /simple Zentangle on my brand new sling back Keds. One will be guided thru a variety of approaches. In this 'simple' sample, I created a floral with a tropical them.
I've used a Micron Pigma before ( I like the fatter tipped pigmas for this) but this time I am using Pentels new Gell Roller for Fabric (I bought at shoplet.com) It seemed a easier applicator since it 'rolls.' There are lots of Zentangle books out there. I quickly figured out I could create a simple contour outline of something I wanted to create... and then just play with interesting textures like shown in some books...OR...quilting books. So here we go...
first a simple floral center
Outline some petals
Add a teardrop shape within the petal
Then create some weight to the overall image by adding tight circles within the teardrop
and leaves
I could have zentangled the heck over the entire surface but I kind of enjoy this clean deck shoe look. I couldn't help myself though... Using a permanent fabric marker, I added a wee bit of summer yellow to sparkle things up a bit.
When the white starts to get dirty... I'll add plenty of ZEN!!!!

I'll be working on a different sample shortly with fabric spray paints and zentangle.

Tuesday, October 18, 2011

A Day In The Park

Okay... a major reason for the Colorado trip was to see Grand daughter Kaley play goalkeeper.

Her team won 3-2 but honestly against a very aggressive and talented offense from the other team. Kaley saved 4 big would-be goals in the first half. My gosh... I never knew she was such a scrappy tough assertive player. 'Made her Grammie proud.
In the meantime, 3 yr old grandson Max was making friends and turning soccer players into football buddies.

Monday, October 17, 2011

A Weekend In Colorado

Well. last week I was a poor poster mostly because I was in a frenzy to get classroom materials organized, shipped to Houston for next Months International Festival. But for the weekend, I used some use them or lose them air miles to visit daughter Allyson and grandkids Kaley and Max in Colorado. We went to a REAL pumpkin farm where you pick them where they've grown. Great time with my'kids."
Beautiful Country!
Who needs a farm scarecrow when you have the 20' Pumpkin Terror watching over the fields?
No question... fall has arrived and is beautiful in it's unique warm way.

Friday, October 14, 2011

Now To A REALLY Nice Birthday Gift

In one of my friendship groups(The Wanabe Quilters), whenever a member has a birthday with an "0" at the end, the group presents her with a quilt. This time, TODAY, is the birthday celebration for friend Karon. We titled this really big table runner "There Must Be 60 Ways To Leave Your 50's !"... and each member filled a flower pot with 5 needle turn applique flowers using their own fabric choices(5 x 12 pots) = 60 flowers. It was organized by the last "0" birthday girl Carol Brodie and quilted by pro-quilter Phyllis Reddish. This was great fun! This thing is so big ("let's just call it a quilted table cloth"), I couldn't get far enough away to get the triangular pointed ends of the runner in the picture.

I'm posting this as I head out to "the party"... so as you read this.... "Karon will hopefully be a happy birthday girl."

Friday, October 7, 2011

Reducing Fear

YEP! It's my goal. I am always trying to think of ways to help newer art quilters continue their journey. Since the fear of quilting a painted piece often seems a big roadblock to finishing, on this piece for Houston, I have photographed how I tackled Santa. I purposely simplified the quilting on Santa so as not to scare anybody. If someone wants to give it a go on their own... they will have a guide or have a guide to possibly hand off if they hire quilting done. Then ofcourse, there's always the option of ignoring my approach and do their own. I REALLY like that idea too!
Click once or twice for closeup view.

Thursday, October 6, 2011

Some Are Seldom Satisfied

That would be me, I'm afraid. I periodically tweak my classroom drawings. This week, I'm working on putting together kits to pre ship for my Houston International "Santa's Secret" Class early next month. I do almost all my drawings at 8 1/2 x 11 so I can save them in my master drawing notebook in a sleeve protector. This afternoon, I'll take my 8 1/2 x 11 inch drawing to my printer to copy as an enlargement at 205%. That translates to 18" x 24"... a perfect class size.

Tuesday, October 4, 2011

Honoring Our Great Heroes

Well how often do we get to do this? My hubby and I recently had the true honor of celebrating the 91 years of life of our dear friend Paul McCay from Glenkirk Church in Glendora, Calif. Paul served and survived WWII in France, and promised God if he got out of there alive, he would serve Him for the rest of his life. He did and he has served the Lord ever since. Glenkirk's homeless shelter is beloved by those in need and is the brainchild of Paul. Shown here at Paul's 91st birthday party is my hubby Ray on the left and birthday boy Paul in the kilt. Pretty handsome guy,eh?
Paul was a nice looking young man in uniform as well.
Not many men can say they still fit in their military uniform, but Paul can. I've never before seen a purple heart. God Bless you Paul McCay for your service to your country and our God.

This Made Me Soooo Happy

When you have so much stuff, you can't find any one of the several same tool you need... It's time to honor Libby Lehman ( the worlds most efficient organizer of quilt stuff). For my working area of my studio, I bought stainless steel shelving from Lowe's, plus extra casters that fit, a new package of peel and stick label for my P-Touch labeler, and got to it. This is pretty self explanatory, so I won't bore you, but I will tell you every minute invested was worth it. I WON'T however tell you how many trimming scissors I found I own though I do now know where all are! ;-)
The benefit of the casters permit me to temporarily roll this shelving to another side of the room when I am painting on the adjacent table or conducting private instruction.
I'd like to think Libby would get a chuckle. She loves labelers.

Monday, October 3, 2011

Ben's New Face... actually Facing.

I often enjoy facing my art pieces as opposed to binding them. It admittedly takes longer but usually seems worth the extra effort. To see the entire process of facing... CLICK HERE to see the April 2009 step by step facing of my mountain lion titled WINTER HUNT!
The brief desciption however is that once the quilted quilt is completely blocked and trimmed/squared, I add a finished edge 2" border of sorts to YES a finished quilt top. Then side by side, I roll the border facing to the back, press, pin, allow to dry, then hand stitch the loose edge as one would do with binding.


I most often use the same fabric used on the backing to create the facing but on this piece, the black and white backing (animal print) might have been distracting from a side hanging view, thus a black facing was used on Ben
You are looking here at one side of facing, rolled to back, steamed, pinned, and drying.

Ben is now done but for sleeves and label. I've posted enough of Ben in full view. I'll add an eye close up here as I am pleased with the emotion in his eyes.

If It Makes It Better- Just Do It!

As I prepared to finish (face) the edges of Ben... My Gentle Giant... I had a small fight with myself. After trimming the quilted top of excess batting and quilt top unpainted fabric, it became clear to me that I had painted and quilted an outside edge area I really didn't need. Knowing that area I knew was not needed represented about 2 hours of quilting,so the fight was with myself for quilting it in the first place...NOT whether I would remove it. So... I measured/ measured... then cut off the unneeded area that would have created an excessive imbalance of Ben's face.
It's gone and it feels right!
So.. I'm busy facing Ben and will post shortly.